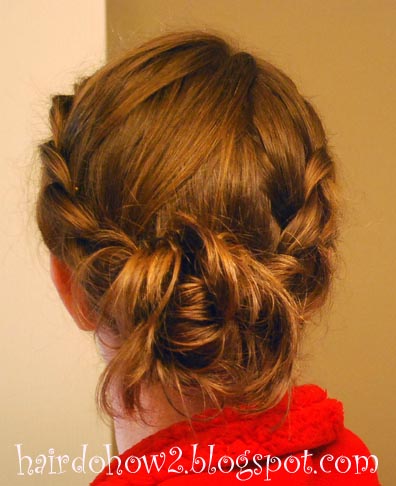
This is a variation on a post I already wrote. This post seems to be a favorite. The only difference is the braid is a dutch braid instead of a french braid.
Showing posts with label dutch braids. Show all posts
Tuesday, April 16, 2013
Thursday, January 24, 2013
Braid with Half-Dutch Headband
Start with an ear to ear part at the front of the ear. Keep the front hair out of the way for a while (clip or bun, etc.). Do another ear to ear part at the back of the ear 3 or 4 cm behind the first part. Pull the back hair into a ponytail. Half-dutch braid across the top middle of the head.
Release the ponytail. Part the hair at the front on the side or middle. Brush it down to the side and give it a little twist. Pull it back to join the hair at the back of the head. Divide all the hair, including the little braid, into 3 sections. Braid it, making sure that the little braid is on top each time its strand is plaited. I added the bang hair into the middle section of the braid to make the little braid more visible at the side.
Friday, January 11, 2013
Waterfall braid Woven-look Ribbon Headband Ponytail
This style is challenging, but so neat! Start with an ear to ear part at the front of the ear. Keep the front hair out of the way for a while (clip or bun, etc.). Do another ear to ear part at the back of the ear 3 or 4 cm behind the first part. Pull the back hair into a ponytail. Half-dutch braid across the top middle of the head.
Lay a ribbon across the top of the head. Insert one end through the hair at the beginning of the braid. (I used a Topsy Tail tool.) The other end will stay put when pull it back into the ponytail because of the braid.
Next do a waterfall braid with the front section of hair. The pictures show this step before the ribbon, but I think it would be better to do the ribbon first. Braid the ends as far down as they will go.
Using a Topsy Tail tool, or floss and a craft needle, thread each "fall" through the dutch braid.
Undo the ponytail. Make a new low ponytail, adding in the extra hair from the falls and the braids. Also add in the ribbon ends.
Tie a bow with the ribbons. Add a flower if you like. Belle's ribbon and flower are provided by Gimme Clips. Thanks Gimme Clips!
Tuesday, June 12, 2012
Half-dutch Headband with Twists into Messy Bun and Variations
Here is a style that I had put in my gallery when my blog was rather new, but never did the step by step directions until now. It's in my banner, too.
Begin with a part at the back of the ears across the top of the head. Put the back hair into a ponytail.
Part a strip from the top of the ears across the top, maybe an inch and a half thick or so. Get the front hair out of the way with a clip.
Do a half dutch braid ending at the side of the head, meaning that you add in all the rest of the from above the ear before you actually get down to the ear. Then braid to the end.
Pull the braided tail over the top of the hairband. Twist the bang section and draw it up over the ponytail, clipping it in place temporarily. You may have to twist part of the hair and then add a little more to it while you keep twisting to get it to look right.
Twist the other side and bring it up over the pony.
Add another elastic over the whole thing.
You can leave it like this. I think it looks nice this way. Or turn the back into a messy bun. You can leave the braid in or take it out.
Here are some old pictures from when I did it a long time ago. On the smaller side I did a regular braid instead of another twist.
Here is another variation with the same general instructions, you just do a hawser twist instead of the half dutch and simple twist. This also just has a fancy hairband on a ponytail instead of a messy bun.
Begin with a part at the back of the ears across the top of the head. Put the back hair into a ponytail.
Part a strip from the top of the ears across the top, maybe an inch and a half thick or so. Get the front hair out of the way with a clip.
Do a half dutch braid ending at the side of the head, meaning that you add in all the rest of the from above the ear before you actually get down to the ear. Then braid to the end.
Pull the braided tail over the top of the hairband. Twist the bang section and draw it up over the ponytail, clipping it in place temporarily. You may have to twist part of the hair and then add a little more to it while you keep twisting to get it to look right.
Twist the other side and bring it up over the pony.
Add another elastic over the whole thing.
You can leave it like this. I think it looks nice this way. Or turn the back into a messy bun. You can leave the braid in or take it out.
Here are some old pictures from when I did it a long time ago. On the smaller side I did a regular braid instead of another twist.
Here is another variation with the same general instructions, you just do a hawser twist instead of the half dutch and simple twist. This also just has a fancy hairband on a ponytail instead of a messy bun.
Labels:
braids,
dutch braids,
hawser twist,
messy buns,
ponytail,
rolled twists,
up-dos
Thursday, May 17, 2012
Dutch Braids into Messy Bun
I won't leave step by step instructions for this, but if you are not sure how to do this by looking at the picture, have a look at these links:
Dutch braid
Messy bun
These little accent flowers are sewn onto mini jaw clips. You can get them from Gimme Clips.
Dutch braid
Messy bun
These little accent flowers are sewn onto mini jaw clips. You can get them from Gimme Clips.
Thursday, February 16, 2012
Lesson 94: Wide and Flat Dutch Braid with Messy Bun
"Boho-chic" or "hobo-chic" is a style that has been coming and going for a while now, meaning basically looking like a stylish mess. (It comes from Bohemian gypsies, hippies, and homeless). I think I pulled it off here... I tried it out on myself one day and then on Belle the next so I could get step by step pictures.
Start by parting the hair on top, side or middle, but not all the way back. Dutch braid both sides. When you take hair from the middle of the head, gather a triangle shape piece with the top of the point at the crown of the head rather than a horizontal rectangular piece. It shows how better on Belle's photo than mine since I couldn't really see what I was doing when I braided my own hair. Hold the ends with clips or loose hairbands.
To make the braid look wide and flat, pull on the outside edge of each plait one at a time. You can start from the top or bottom, going back again to readjust any that get tightened up again.
Fasten the braids together at the base of the head, and then make a messy bun.
This was a school day, so I used tiny jaw clips to hold the messy bun in place as well as bobby pins. Then I covered it up with this flower thingy I made for her Halloween costume to hide some of the clips.
Start by parting the hair on top, side or middle, but not all the way back. Dutch braid both sides. When you take hair from the middle of the head, gather a triangle shape piece with the top of the point at the crown of the head rather than a horizontal rectangular piece. It shows how better on Belle's photo than mine since I couldn't really see what I was doing when I braided my own hair. Hold the ends with clips or loose hairbands.
To make the braid look wide and flat, pull on the outside edge of each plait one at a time. You can start from the top or bottom, going back again to readjust any that get tightened up again.
Fasten the braids together at the base of the head, and then make a messy bun.
This was a school day, so I used tiny jaw clips to hold the messy bun in place as well as bobby pins. Then I covered it up with this flower thingy I made for her Halloween costume to hide some of the clips.
Friday, January 27, 2012
Lesson 91: Ribbon Accented Braid Wreath
It isn't exactly a wreath, but what would you call this? Check out the french braid with ribbon post before trying this one if you need extra help.
Start by parting out the top section of the hair and brushing the back half into a ponytail. Then make a center or side part on the top half. Use a clip to hold the center of a long fat ribbon onto the part. Here's a detail of the top:
Braid each side down using the half-dutch technique and adding the ribbon into one of the strands. Make sure you keep the ribbon on top so you can see it. When you run out of hair at the ears, keep braiding without adding more hair, still careful with the ribbon. Hold it with a clip when you have braided enough to get just past the ponytail. Repeat on the other side, and let the clip at the top out. Add both braids to the ponytail by putting another band around the whole thing. Next, I wrapped the ribbons around to hide the hairband. Then do a simple braid for the rest of the hair, adding a ribbon in each of two strands. Add another hairband, and tie a bow.
Start by parting out the top section of the hair and brushing the back half into a ponytail. Then make a center or side part on the top half. Use a clip to hold the center of a long fat ribbon onto the part. Here's a detail of the top:
Braid each side down using the half-dutch technique and adding the ribbon into one of the strands. Make sure you keep the ribbon on top so you can see it. When you run out of hair at the ears, keep braiding without adding more hair, still careful with the ribbon. Hold it with a clip when you have braided enough to get just past the ponytail. Repeat on the other side, and let the clip at the top out. Add both braids to the ponytail by putting another band around the whole thing. Next, I wrapped the ribbons around to hide the hairband. Then do a simple braid for the rest of the hair, adding a ribbon in each of two strands. Add another hairband, and tie a bow.
Tuesday, January 24, 2012
Lesson 90: Half Dutch Braided Heart
The first step is for bangs. If you have cut bangs, skip this step. You can do Barbie bangs if you want. What I did here was to pull the bangs down to the side (sprayed with water) temporarily with a spring hinge clip or bobby pin, and then added the hair into the braid at the side (after removing the pin) once I got down to that section. Add the bangs into the braid a little at a time, in about two or three plaits.
Part the hair across the middle at the top of the head. Make curved parts to form the top half shape of a heart, and then straight down to the ears. Pull the rest of the hair into a temporary ponytail to keep it out of the way. Beginning on one side of the part, do a half dutch braid around the curve. When there is no hair left to add in, continue braiding down to the end. Secure temporarily. Repeat on the other side, and then band the two braids together forming the bottom shape of the heart. Release the temporary hairbands.
This hairstyle should be sprayed with hairspray to help prevent the loose hair hanging behind the heart from getting pulled into messy arches over the braids.
Part the hair across the middle at the top of the head. Make curved parts to form the top half shape of a heart, and then straight down to the ears. Pull the rest of the hair into a temporary ponytail to keep it out of the way. Beginning on one side of the part, do a half dutch braid around the curve. When there is no hair left to add in, continue braiding down to the end. Secure temporarily. Repeat on the other side, and then band the two braids together forming the bottom shape of the heart. Release the temporary hairbands.
This hairstyle should be sprayed with hairspray to help prevent the loose hair hanging behind the heart from getting pulled into messy arches over the braids.
Monday, December 5, 2011
Lesson 81: Cornrow Headband with "Hair" Bow
This is a style that can only be done on really long hair.
Begin with Barbie bangs, as described in this post. Part a row parallel to the part already in the hair, and then pull the rest of the hair back temporarily. Beginning near one ear, dutch braid the row until you run out of hair above the ear. A cornrow is just a skinny dutch braid.
Braid all the way down and add an elastic.
Bring the end of the braid around the back and up to the side above the ear. Divide the tail end into two sections, loop each in half so the ends cross over, and use a mini clip to hold the bow shape down to the scalp.
Let down the rest of the hair.
Begin with Barbie bangs, as described in this post. Part a row parallel to the part already in the hair, and then pull the rest of the hair back temporarily. Beginning near one ear, dutch braid the row until you run out of hair above the ear. A cornrow is just a skinny dutch braid.
Braid all the way down and add an elastic.
Bring the end of the braid around the back and up to the side above the ear. Divide the tail end into two sections, loop each in half so the ends cross over, and use a mini clip to hold the bow shape down to the scalp.
Let down the rest of the hair.
Monday, August 1, 2011
Thursday, July 21, 2011
Lesson 61: Dutch Braid Magic
Here are two styles that have a bit of a magic trick to them to make them look extra special.
The first one is two dutch braids at the side of the head. When you have finished both sides, use a bobby pin to connect the two braids together. Just open up the pin and slide it in towards that back side of the braids so that it has a little bit of hair from both braids from two or three sections of plaiting. Tie the braids together at the ends with a bow or another hairband.
I like to call this one "Double Dutch," but it is really two half-dutch braids. Part the hair down the middle, put one side in a temporary ponytail, then do a half-dutch braid along the part line. Let out the ponytail and do another half-dutch braid with the remaining hair. Tie the ends together. You can stick a bobby pin in the tails as above, but I didn't think it was necessary. If your braids diverge from each other at the part, you can bobby pin them together so it doesn't destroy the illusion of it looking like a complicated four-strand braid.
Monday, July 11, 2011
Lesson 59: Half Dutch Braid
The half dutch braid is similar to the dutch braid, but you only add hair to one side. This is one of my favorites to play with because the braid covers up the part. Today I started by parting the hair from ear to ear and pulling the bottom half into a temporary hairband.
Start on one side by getting a small section of hair and dividing it into three pieces. Begin like a regular upside down braid: one side under middle then other side under middle. Begin with the side that is away from the part.
Now add hair to the next section ready to go under. Gather the new hair all the way back to the part, then cross it all under the middle piece.
Bring the next piece under the middle without adding any hair to it.Continue in this pattern--adding hair only on the side away from the part--until you run out of hair to add in. Continue braiding, and add an elastic.
The beginning of the braid doesn't cover the part as well. I am experimenting to find a solution to that, if there is one. Please leave a comment if you have a trick.You can leave it like this, or pull it back with all the rest of the hair into a ponytail. I added a bow and this cute flower from Gimme Clips.
Subscribe to:
Posts (Atom)