Wednesday, March 27, 2013

Happy Easter!

Happy Easter everyone!  I hope you are all enjoying the spring as much as I am.

For inspiration for more Easter hairstyles, take a look at the side-bar links to hairstyles for Easter, up-dos, and special occasions, or look in our gallery.

No tutorial today--our family is so busy!

Thursday, March 14, 2013
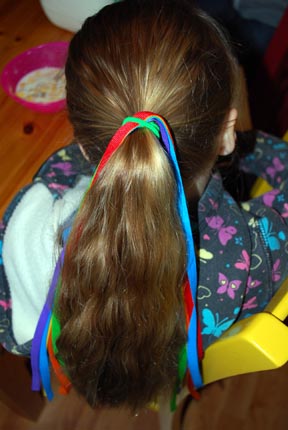
Rainbow Ponytail


Happy St. Patrick's Day!  My idea for this was to put some gold at the end of the rainbow, but I created this before school and didn't have time for perfection.  I had wanted to use some gold Christmas wrapping ribbon at the end of the ponytail, but didn't have time.

To begin, put the hair in a ponytail.  Measure a piece of ribbon off the spool the length of the ponytail, add a little bit more to account for wrapping, and then double it.  Cut the ribbon.  Cut all the other ribbon colors the same length.  Insert the ribbons stacked in rainbow order (red, orange, yellow, green, blue, purple) into one of the loops of the hairband, and center the ribbon.
Pull the ribbons around to the back of the ponytail.
At this point at first I tried to do a fishtail with adding a ribbon to each strand.
I had trouble with this when I came down to the second go-round of colors.  I didn't have time to really figure it out, so I started again just fishtailing the ribbons, no hair.  It ended up like wrapping a maypole.
Once you have crossed each ribbon over once, start again one at a time by bringing the ribbon around the back of the ponytail and then over top of the last ribbon that was crossed over.
Repeat with each ribbon.  With Belle's length of hair, I was able to do three "rainbows."  The ribbons will be bumpy and loose and cover each other up, but you fix that by pulling them tighter at the ends and scooting them over.
I added a big green flower that probably came from a dollar store.  Like I said before, here would be the part to add the gold at the bottom.
If this fishtailing is too hard for you, I also imagined braiding with a regular braid adding two ribbon colors to each strand: red and orange for one, yellow and green for another, and blue and purple for the third.  I haven't tried this yet, but perhaps I will.

If you have success with this hairstyle or have any tweaks or improvements, I invite you share your photos on our facebook page!

Don't forget to check the link at the sidebar for more St. Patrick's Day hairstyles.

Monday, March 4, 2013

Elegant French Braid Updo

One of my young friends at church wore an adorable hairstyle similar to this some time ago.  It really struck my eye.  Gorgeous!  She had two regular french braids with a part down the middle, and the tails wrapped up like in this one.  It inspired me to try this on Belle with a little improvement in the braiding technique to lose the part.  This is done with french braids down both sides of the head, but rather than adding horizontal rectangles of hair to each plait, you add tall triangles with the top point at the same place each time.  The top front does have a part, at the side or middle, so you braid like normal at the beginning, but once you reach the crown of the head, you start adding triangles rather than rectangles.  The braids come close together at the back of the head.  Braid out the tails as far as you can and then add a clear elastic to each.
Next you need to wrap the braids together, almost tying them in a knot.  This diagram helps show the path that each braid takes.  If a braid doesn't turn sharp enough on the side, you can can try folding it and turning it backside out like I did on the right here.
If Belle's hair were just a little bit longer, the elastic would've been easier to hide.  At least it is clear.
Tuck the ends in to hide them, and add bobby pins.  Belle wanted these You-Pins (from Lilla Rose) to decorate.  You could use little flowers or ribbons or leave it without extras.