Wednesday, October 27, 2010

Lesson 21: Whale Spouts

Last Sunday we had the Primary program in church where all the kids had talks and sang the songs they have been learning this year.  Belle's talk was about Jonah.  She wrote it herself, memorized it, and got up in front of everybody to say it.  I am really proud of her!  For the special occasion, she wore her sailor dress to remind her to be brave and sail to Nineveh (not Tarshish).  We made whale spouts in her hair to go along with the theme.  Here's how:
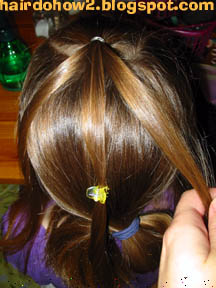
First put the hair into pigtails and braid down.  I could have done a hawser rope to really go along with the theme, but I didn't want to go overboard. (lol)
Next, bring the end of one braid up through a twist or two of the hairband.  I used my topsy tailer to make it easier, but you could just shove it through with your fingers.
Belle's hair was dry so the ends stuck up straight like this.
I sprayed them down with my trusty water bottle and combed through them to make sure every piece was damp.  The weight of the water pulls the hair down, and it stays down once it has dried.
Repeat on the other side.  Cover up the hairbands with ribbons, if you want.  (Ours are mismatched, but it's all we had.)  Isn't she "like a star shining brightly?"


Here is one of the songs Belle loves to sing.  Click here to hear it.
I am like a star shining brightly,
Smiling for the whole world to see.
I can do and say happy things each day,
For I know Heavenly Father loves me.

Monday, October 25, 2010

Mermaid

Belle wants to be a mermaid for Halloween.  We did this practice run over the weekend.  The shells and pearls are just laid on top for effect to show what I wish I could do, if my hot glue gun weren't packed in moving boxes.  I would have glued them onto the ends of the bobby pins.  I'm not actually giving a tutorial for this one here, unless there are any requests, but it is basically a bunch of rosette buns made from twisting up pieces of hair, wrapping them into circles, and pinning them in place.  I didn't take step by step pictures because I was just playing.

Friday, October 22, 2010

Lesson 20: Topsy on top

Today Belle's hair was wavy from some dutch braids we left in overnight.  I wanted to take advantage of it by leaving her hair mostly down.  Begin this one with a side part.
Make two more parts to divide the hair on top into a box.  Secure the underneath hair into a temporary ponytail.  Spraying a little water on it will help to keep the flyaways down and out of the way.  Next, divide the box into three or four sections and secure each one with a tiny hairband.
Now get your topsy tailer ready.  Instead of just sticking it through above the hairband like the Topsy Tail and Tiny Topsy posts, use the pointy side to split the hair section in half, just as if you were going to divide each section into another part, and then tuck the end through under the hairband.  This little step may not be completely necessary, but it will ensure that your finished look is symmetrical.
Pull the tails through the loop and pull the whole thing down and through.  When I did this, the little tails didn't like to turn around inside out on their own, so I had to pull the tails down until they turned.  Then just tighten them up by splitting the tail and gently pulling the ends away from each other so the band slides up a little.  If the twisties don't go even, try pulling down on little sections of hair in the tail to flatten out the bumps.

This technique would also look really cute if you turned the rows the other direction going toward the back of the head rather than toward the ear.  Then you could add extra rows and go from ear to ear.

Thursday, October 21, 2010

Lesson 19: Tiny topsy

This is just as easy as the last post, but instead of starting with the low ponytail in back, do a small piggy in front.  Use a side part and then part out a block from the top of the head.  It will be like three sides of a square with the forehead being the fourth side.  Secure it with a hairband in one of the back corners, or the middle would be okay, too, for a different look.  Insert the smaller topsy tailer (or needle, or fingers...), put the piggy hair through the loop, pull it down and through, and tighten it up.

Forgive the weird designs in the picture.  My photo editing software is a little glitchy sometimes.

Wednesday, October 20, 2010

Lesson 18: Topsy Tail

Topsy Tail is actually the name brand product from scünci, but it has become known also as the name of the hairstyle.  Mine are actually a knock-off brand from Hong Kong that I bought on eBay for $5.
To do the hairstyle, begin with a simple low ponytail.
Insert the topsy tailer into the ponytail about the hairband.  Push it all the way through until the point comes out underneath the ponytail.
Pull the hair up and through the loop of the topsy tailer.
Pull the topsy tailer down, making sure that the hair doesn't fall out of the loop.  The hair will be pulled through the hole and make a twist.
Separate the pony into two sections and gently pull them apart to make the hairband slide up a little higher to tighten it all up.

There are more ways than one to do this.  If you don't have the actual topsy tailer, you can use a craft needle (plastic or metal) like this:
Mine is curved, which comes in handy for finishing knitting projects, but straight would be better for hair.  They are inexpensive.  Thread it with a long piece of ribbon, yarn, dental floss, or whatever you have on hand folded in half.  The needle becomes the point (but since it isn't sharp, it won't hurt) and the string becomes the loop.  If you don't have a craft needle, use the tail end of a rat tail comb to separate the hair (or a pencil, whatever) and stick your pointer finger and thumb up from the bottom through the hole.  The hairband will have to slide down and loosen up a little for this to work.  Grab all the ponytail hair with your pinchers and pull it through.  Tighten up the hairband.  You might be able to start with a loose ponytail and then twist the hairband around the hair one more time at the end.

Wednesday, October 13, 2010

Lesson 17: Upside down braid

This braid looks just like the regular braid, only upside down. Divide the hair into three strands.  Instead of alternating bringing opposite sides to the middle, you bring the middle strand to the outside. (Middle to the right, middle to the left, middle to the right, middle to the left.)  For the style in the picture, part the hair in two boxes in front (in the center or to one side).  Braid each section and put in a temporary band or clip.  Brush the remainder of the hair in the back into a ponytail.  Add the braids in and wrap another hairband around the whole thing.  Then undo the temporary clips and brush out the tail smooth.  If you try to add the braids in with the ponytail with only one hairband, it is harder to get it to stay smooth. The braids sink down into the rest of the hair instead of standing out on top.

Thursday, October 7, 2010

Lesson 16: Indian braids


Begin by parting the hair down the middle as if you were going to make pigtails.  Put a temporary band in one side to keep it out of the way.  If your part is really straight down the middle, it doesn't matter which side you start with.  If you have made a side part in front (angled to the center and straight down the middle in the back), put your temporary band in the side that has the smaller section of hair in front.  Your first braid will be on the side with the most hair.
Gather the hair as if to make a low pigtail, and brush it smooth.  Divide it into three equal sections.
Braid the hair.  For the first crossover, use the section of hair that comes from near the forehead.  Continue braiding down to where the hairs start to get short and pop out.  Secure it with a hairband.
Repeat on the other side.  If you have a side part in front, you should be able to braid down a farther distance before the shortest hairs start popping out.  Instead of going down as far as you can, try to match the placement of the hairband in the first braid.  Otherwise you'll have one long braid and one short braid.

Tuesday, October 5, 2010

Lesson 15: Spiderweb


My intention for this blog was to begin with the basics and put in gradually more difficult hairdos, but with Halloween coming up, I wanted to slip this more advanced one in.  Begin by making an ear to ear part across the top of the head.  (If I were to do this again, I would bring the part further back on the head and place all the piggies closer together to make a smaller web.)  Temporarily secure the bottom section.
Divide the top into three sections angling the parts to be something like a V.  Secure the middle section with a hairband.  I used clear since real webs are clear, but you could use a color if you choose.  Divide the piggy into three equal strands.  Temporarily clip the middle one down.
Add one of the sections to the rest of the hair (giving it a little twist so it stands out better) on one side of the front and secure it.  Repeat on the other side.

Undo the temporary clip and hairband.  Clip the little middle strand off to the side to get it out of the way.  Part the back section of hair straight down the middle.  Just at the top of the neck take a small triangle section of hair out.  Here my directions are going to vary a little bit from the pictures because this was trial and error...  Put the bottom right and left sections into pigtails (leaving the bottom triangle free).  In the pictures I added the web strands now, but it would be better to wait.  Try to make the placement of the hairbands even so there will be six corners to the web.

Take the top middle web strand and give it a little twist so it will be more visible.  Attach it to the little triangle section at the bottom.  Divide this new piggy into two equal strands.  Each one will then be added to the bottom side piggies with another elastic.  In the pictures the top sides are already there, but by the directions, this is the time to add these strands in.  Split the top piggies into two strands.  Half will cross over to the opposite side; half will go straight down to the lower side piggies.  You will be adding three web strands to each bottom piggy.


For the finishing touch, add a little black clip to keep the strands together in the middle.  This is the spider.
For a variation, you could braid or rope twist the spider strands.  If you have time, you could weave a piece of thin ribbon round and round all the way out.  The picture at the top of the post shows the second time I tried.  I twisted the web strands tighter and they stand out better.  If you come across a plastic spider ring, you could stick that in middle.  That would make it more obvious what the hairdo is.

Lesson 14: Small braid in front with anchor

This post is actually for three different hairstyles (though they aren't all that different).  To begin, make a part from one side of the forehead straight back across the top of the head.  Draw another part with the comb beginning on the first part and moving perpendicular (right angle) across to the other side of the head. 
Divide the section into three strands.
Braid the sections together.  That could be the end of it.  Secure it with a hairband and you're done with hairdo number one.  Otherwise, just use a little jaw clip to hold it temporarily and continue on.  Hold the braid back against the head to find the spot where you want to anchor it.  Pick up a small  (about 1/4 in.) strand of hair from the scalp.
Use a small hairband to connect the braid to the strand of hair.  Undo the rest of the braid under the hairband.  That's hairdo number 2.
When I did this in Belle's hair, the hairband didn't have enough grip and kept sliding down the extra strand, so depending on the texture of your daughter's hair and the type of hairband you use, this may or may not work.  So I took out the hairband and added the extra strand of hair into one of the three strands of hair from the braid.  Continue braiding down and secure.  Hairdo number 3.