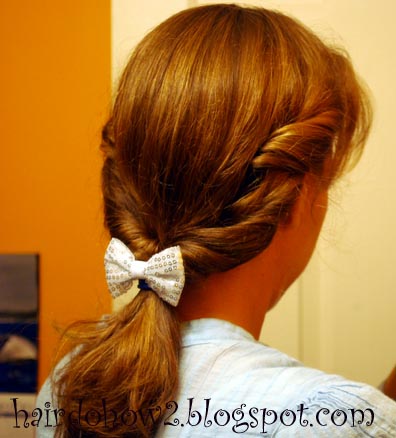
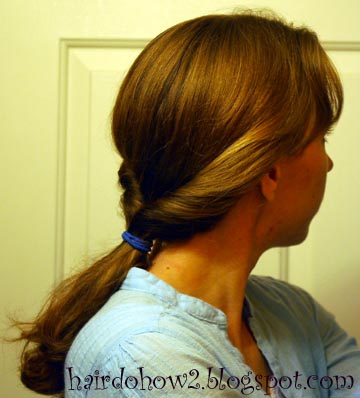
It's time for school pictures again. There are a few things to think about when choosing a hairstyle for a photo shoot. First of all, the back of the head obviously isn't going to be seen, so any style that looks amazing from the back but not the front is not a good choice. I prefer down-dos rather than updos because they tend to frame the face better, in my opinion. I also like seeing how long Belle's hair is from year to year in her portraits since it has changed in length so much over the years. I think the person's face should be what draws attention in a portrait, and that the hair should complement the face, rather than draw attention away. That is why I choose simple styles with few or small embellishments rather than large flowers and bows. Here is Belle's picture day hair for this year. It is a hawser twist done like a half dutch braid (adding hair from only one side) with the bang section of hair.
Rather than spend an arm and a leg on portraits from the school (which often come back looking goofy anyway), I take a portrait of my kids at home. I took this portrait last week in our bathroom. I hung some fancy sheer fabric over the shower curtain rod, brought in an extra lamp, and took a bunch of shots. I let Belle choose her favorite, and then touched it up on my computer. Now I can print as many as I want wherever I want to have them printed. (Belle's sparkly bobby pins are from Lilla Rose.)
Wednesday, October 24, 2012
Tuesday, October 16, 2012
Curlformers Review
Curlformers are a hair curlers that work in a way that reminds me of slap bracelets. They can be straightened out (though they don't stay straight on their own), and then roll back up into a twist. They are a hollow mesh flattened tube. The trick is to insert a long hook into the tube, push it all the way through the other end, hook a piece of hair, pull the hook so the hair goes inside, then release the end of the Curlformer so it wraps up. After the hair has set for a while, you simply pull the curler off the hair.
(These pictures are from an old post for an updo.) The curls are soft and pretty. I have tried putting them on dry hair, and even after sleeping the whole night, they do not hold very long. It is best to use them in damp hair with some sort of product in it like mousse. Even then the curls will not last as long as rag curls. The best thing about Curlformers is that they are the fastest way to curl hair I know of (if you don't count the time you have to leave them in). They are faster than rollers, rags, or curling irons, and of course it's better for your hair to choose a no heat option.
There are a few cons. Sometimes they hurt a bit putting them in because the hair can get pulled too tight on the hook and with the rubber ends of the curlers. Also, if you try to use too big of a section of hair, you can get the hair and hook stuck in the middle of the tube. Curlformers are very expensive! When I first heard of them, I was excited to try them out until I discovered how much they cost. You can buy a whole kit for a somewhere around $60 or so, but I don't remember really how much. I elected to get a refill pack and a hook to start of. The refill pack has only 6 curlers. I think it was about $13 or so... I waited until I had a really good coupon, and I got them at half price. Then several months later I bought another six with another good coupon. I am gradually building up my supply.
Belle does not complain about them while she is sleeping when there are only a few, but I think she may have a hard time with a whole head full of them all night. I can't sleep with anything in my hair, personally.
Tuesday, October 9, 2012
Disney's Beauty and the Beast Belle Hairstyle
Begin with damp hair. You can add some styling product such as gel or mousse at this point. Comb it all back straight.
Using a hairdryer, blow the bang area hair back while using a comb to train the hair to go where you want it.
Comb back, and then push the comb forward to form a bump. Add some hairspray. You can continue to blow it a bit, perhaps on low or with a diffuser if your hairdryer's high setting blows the hair all over the place and out of the comb.
Use a comb or brush to blow out the sides sections over the ears. Use the same technique as you did with the top.
Part the hair in the middle. If you do not have cut bangs, you could try to get a poof by adding a bobby pin in this place after lifting and pushing the hair forward.
Take the side section and brush it toward your face. Hold it out and twist it loosely.
Pull it back against your head...
...and then push it upwards. Add a bobby pin to hold it down. This is done in a similar way to the Dorothy hairstyle. (This is a nice finished style for a regular day.)
Repeat on the other side. Brush down the hair at the back of the head so it is smooth. Now roll up loosely the hair that is at the bottom side.
Repeat on the other side, then put them together.
The twist will be laying over some hair from the back of the head. It may be necessary to add some of this hair into the twists, if you can manage it. You may need to ask for someone's help to hold one of the twists for you while you work on the other. Add an elastic around the whole thing.
To get some more poof, gently pull out some of the hair at the edges of the roll.
Add a bow. You can tie a ribbon to make a bow or add a bow clip. (Mine are Gimme Clips--these will be coming out to Associated Food Stores, but there isn't a blue one.)
For a more everyday look, after I took these photos, I undid the whole thing, brushed it through (especially to settle down my bangs), and twist the sides in one step instead of two, and without trying to get the extra volume.
Wednesday, October 3, 2012
Braid Rose
This is a really easy but really cute hairstyle. Just gather a section of hair near the forehead, braid it down to the end, add an elastic, and then coil it up. Tuck the tail underneath, and put in a few bobby pins to hold it in place.
Subscribe to:
Posts (Atom)


