Wednesday, July 27, 2011

Lesson 63: Disney's Cinderella Hairstyle

This is Halloween 2009.  Belle is obviously dressed as Cinderella.  Sweetheart (not so obvious) is Calvin and Hobbes.  It has been some time since I did her hair, so I don't know exactly how I did it that day, but I've tried to recreate it here for you.  In the picture above, I actually had bought a headband and covered and stitched it with fabric to make it blue (since I couldn't find a blue one in the store).  She lost it at school, so this tutorial is showing another headband that has a huge bow on. it  That's not quite appropriate for Cinderella, but it's the best we've got now.  And yes, I know it isn't Halloween yet, but perhaps your little princess likes to play dress-up...

To begin, put the front half of the hair in a pigtail with the elastic at the part (elastic is not temporary) and twist it up and clip it out of the way temporarily.  Gather the back half of hair as if to put it into a low ponytail.
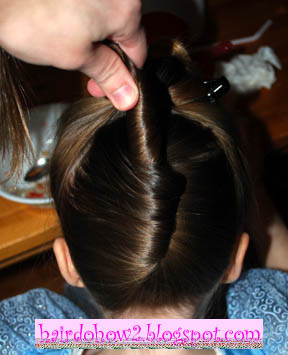
Begin twisting the hair.
Pull the tail upwards as you continue to twist.
Keep twisting.  You may need to make some minor adjustments to the hair that is going to start pulling over the top of the twist by shaking the tail gently or using a comb to guide it across smoothly.
Keep twisting (and adjusting it if necessary) until the hair rolls over all the way up to the part.
Now put an elastic in at the top to  keep it rolled up.
Undo the clip in the front.  You now have two tails sticking out at nearly the same place.  Next you will roll and wrap one of the tails around the other (it shouldn't matter which) to make a bun with a tail sticking out the middle.  Pin it in place.
Now add the headband.
Take the tail that is left and loop it around like this:
 Keep rolling into the loop until all the ends are in a circle. 
Lay the loop down (sideways or up and down) across the headband and pin it in place.


 This could make an elegant up-do for a special occasion if you just left out the headband.

Monday, July 25, 2011

Lesson 62: Ponytail with Two Braids

This is a super easy and fast style.  Just put the hair in a ponytail, split the tail in two, and then braid the two sections.  It is so simple, but adding two braids instead of the one you always see makes it unique.  For the bow on top, I had a piece of ribbon too short to wrap around the hairband (the only orange I had), so I just folded the ends over twice to form two loops and then slid a bobby pin over the center.  I tucked the bobby pin in behind the hairband, and it stayed in place there.

Thursday, July 21, 2011

Lesson 61: Dutch Braid Magic

Here are two styles that have a bit of a magic trick to them to make them look extra special.
The first one is two dutch braids at the side of the head.  When you have finished both sides, use a bobby pin to connect the two braids together.  Just open up the pin and slide it in towards that back side of the braids so that it has a little bit of hair from both braids from two or three sections of plaiting.  Tie the braids together at the ends with a bow or another hairband.
I like to call this one "Double Dutch," but it is really two half-dutch braids.  Part the hair down the middle, put one side in a temporary ponytail, then do a half-dutch braid along the part line.  Let out the ponytail and do another half-dutch braid with the remaining hair.  Tie the ends together.  You can stick a bobby pin in the tails as above, but I didn't think it was necessary.  If your braids diverge from each other at the part, you can bobby pin them together so it doesn't destroy the illusion of it looking like a complicated four-strand braid.

Monday, July 18, 2011

Happy 1st Blogiversary!

Yesterday marked the one year anniversary of Hairdo How-to's first post!  Yesterday the pageview marker rolled over 40,000.  I have 32 followers.  So far the most popular post has been the Rapunzel braid with 451 pageviews (and not a single comment--go figure.)  This has been fun!  Thanks for reading.  I still have more ideas to post than time to do it, so keep coming back.  And tell your friends!

Friday, July 15, 2011

Lesson 60: Messy Bun

Although a messy bun is intended to look messy, it really is organized chaos, and takes a bit of practice to master.  There are many different techniques, and some work better on different hair types and lengths.  The basic technique is to pull the hair into a ponytail, and then make loops out of the tail, arrange them randomly, and pin them in place.  I often make the first loop when putting the hair in the ponytail by not pulling the tail all the way through on the last loop of the hairband, like the workout bun.  You can also twist the hair and wrap it around as if making a regular bun, but keep it sloppy and don't tuck the ends in.


Here is a collection of videos from other places that will give you an idea of some different ways of doing it.  I've spent way too much time searching the internet for good videos and found none better than these that I started with.
Babes in Hairland "My Way"
Babes in Hairland Long Hair Messy Bun
Princess Hairstyles
Girly Dos by Jenn

Cutie Pie Hair Creations

Sweetheart wanted to show off his new haircut and be in a picture, too. 
 

Monday, July 11, 2011

Lesson 59: Half Dutch Braid

The half dutch braid is similar to the dutch braid, but you only add hair to one side.  This is one of my favorites to play with because the braid covers up the part.  Today I started by parting the hair from ear to ear and pulling the bottom half into a temporary hairband.
Start on one side by getting a small section of hair and dividing it into three pieces.  Begin like a regular upside down braid: one side under middle then other side under middle.  Begin with the side that is away from the part.
Now add hair to the next section ready to go under.  Gather the new hair all the way back to the part, then cross it all under the middle piece.
Bring the next piece under the middle without adding any hair to it.
Continue in this pattern--adding hair only on the side away from the part--until you run out of hair to add in.  Continue braiding, and add an elastic.
The beginning of the braid doesn't cover the part as well.  I am experimenting to find a solution to that, if there is one.  Please leave a comment if you have a trick.
You can leave it like this, or pull it back with all the rest of the hair into a ponytail.  I added a bow and this cute flower from Gimme Clips.

Thursday, July 7, 2011

Lesson 58: Star with Ribbon

Belle's 4th of July style this year was a star with ribbon over it.  Follow the directions for the twisted star.  Then slip the end of a long ribbon through a loop of each elastic.  Begin with a bottom piggy, leaving an end a few inches long.  Next the top middle, then the other bottom piggy, across to the other side on top, then straight across to the other top side, and back down to the bottom where you began.  You can leave the ends loose or tie them into a bow.  I used several pieces of ribbon to tie bows around each piggy.  You could also use clip bows or flowers.

Saturday, July 2, 2011

Lesson 57: Sea Star

 The inspiration for this style came from Girly Do's By Jenn and her post called Flower Bun.
Begin with a ponytail.  Divide the tail into 5 even sections.  Add an elastic to each section about 2-3 inches (5-7 cm) down.
Split one of the sections beneath the hairband.
Turn the band to go through the loop.  It doesn't matter which direction, but it will look slightly different depending whether you go to the front or to the back.
Wrap the tail end of the hair into loops, keeping the ends at the back.  It helps if the hair is wet.  Lay the loops down against the head so the twisted part is straight out.
Put in some bobby pins to hold it in place.
Repeat with all the sections keeping the loops going in the same direction.
Here is a shot of the same style where I used mini clips to help hold it in place, and I turned it through the loop in the other direction (from the back).  This was some time ago when Belle's hair was medium length so there weren't so many turns in the loops, but it looks the same.
I posted two today, so be sure you keep scrolling down to see the other star style.

Lesson 57: Twisted Star Hairstyle

I learned the basic technique for the star from Princess Hairstyles.  It has become one of our favorites, and we do it often around Independence Day (4th of July) and Christmas.  Thank you, thank you, Princess Hairstyles!  Rather than reinvent the wheel here, I just want to show a little how I've tweeked it for my own preference.  Please look at the link above to get the step by step.
If you can see it in the picture, I have changed the shape of the parts.  The Princess has a triangle shape section of hair with the point at the forehead.   Belle's triangle shape has the point at the back.  Another difference is the placement of the hairbands at the sides.  Rather than pull the hair together in the middle of the section, I have put the hairband along the part.  The part then sort of fills in for the fifth missing side of the star.

Instead of doing hawser twists, I've just twisted each section.  It won't hold on its own with hairbands, so you have to use clips to stick them to the bottom piggy until you get the hairband over it.  Also, if you twist the two pieces from the middle top section in the same direction, you might have a problem with the hairband rolling over.  If that happens, you can twist the two pieces in opposite directions.

Here's another shot when we've done it with braids.  It is a little more difficult to recognize that it is a star this way, but still an interesting and fun style.