Showing posts with label St. Patrick's Day. Show all posts

Thursday, March 14, 2013

Rainbow Ponytail


Happy St. Patrick's Day!  My idea for this was to put some gold at the end of the rainbow, but I created this before school and didn't have time for perfection.  I had wanted to use some gold Christmas wrapping ribbon at the end of the ponytail, but didn't have time.

To begin, put the hair in a ponytail.  Measure a piece of ribbon off the spool the length of the ponytail, add a little bit more to account for wrapping, and then double it.  Cut the ribbon.  Cut all the other ribbon colors the same length.  Insert the ribbons stacked in rainbow order (red, orange, yellow, green, blue, purple) into one of the loops of the hairband, and center the ribbon.
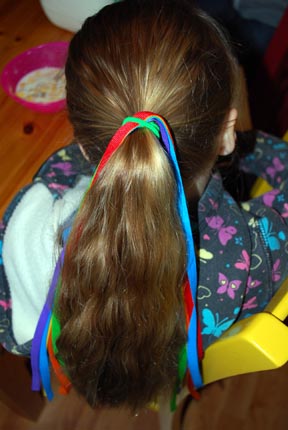
Pull the ribbons around to the back of the ponytail.
At this point at first I tried to do a fishtail with adding a ribbon to each strand.
I had trouble with this when I came down to the second go-round of colors.  I didn't have time to really figure it out, so I started again just fishtailing the ribbons, no hair.  It ended up like wrapping a maypole.
Once you have crossed each ribbon over once, start again one at a time by bringing the ribbon around the back of the ponytail and then over top of the last ribbon that was crossed over.
Repeat with each ribbon.  With Belle's length of hair, I was able to do three "rainbows."  The ribbons will be bumpy and loose and cover each other up, but you fix that by pulling them tighter at the ends and scooting them over.
I added a big green flower that probably came from a dollar store.  Like I said before, here would be the part to add the gold at the bottom.
If this fishtailing is too hard for you, I also imagined braiding with a regular braid adding two ribbon colors to each strand: red and orange for one, yellow and green for another, and blue and purple for the third.  I haven't tried this yet, but perhaps I will.

If you have success with this hairstyle or have any tweaks or improvements, I invite you share your photos on our facebook page!

Don't forget to check the link at the sidebar for more St. Patrick's Day hairstyles.

Thursday, March 15, 2012

Lesson 98: Simple St. Patrick's Day

Last year for St. Patrick's Day I posted some more challenging styles for making shamrocks and clovers out of hair (see the right side bar).  This year we're keeping it simpler with some less time and skill intensive styles.

First, this little clover looking flower is from Gimme Clips.  (Clover flowers are really purple and white, I know, but we need green to avoid the pinching, right?)  The flower is sewn onto a small hairband.  This was our Daylight Savings Church Day hairstyle (with a blue one that day).  Just make a side part, and then part out a small section from the top of the head to the temple.  Add the hairband, being careful not to get the petals stuck under the hairband twists.
This picture was taken before school one day this week, then I looked out the window and noticed it was windy, so I added some Indian braids (upside down) with the matching hairbands that came with the flowers.
Here's another way to green up a regular hairdo.  Tie some green ribbon into a bow around the end of a bobby pin and insert it into a bun or messy bun.
Keep scrolling down.  I put up two posts today.

Thursday, March 17, 2011

Happy St. Patrick's Day!

Yesterday my blog rolled over 10,000 page views.  I think that is awesome!  Not a baby blog anymore!

I'd love to get out and see all the green shirts and clover hairdos today.  I tried out this clover style from Adopt A 'Do (you've probably seen this one if you did a Google search--it's all over the place).  I had some trouble keeping the clover leaves from sticking out, though.  I thought that maybe using a thinner hairband on the pony tail would help that, so I tried a skinny one.  It didn't solve the problem, though.  I used a lot of bobby pins, and it turned out okay, but if I tried again, I think I'd put in a thick hairband at the pony tail then tuck the tails from under the clover leaves into the same hairband.  I don't know if that would work because it might turn the tail in toward the head.  Starting with an upside down pull-through could solve that.  Another idea to try: instead of wrapping the hairband just around the two twists, wrap it around the twists and the base where the petal comes out of the ponytail.  You'd have three bands showing, then a fourth to put them all together.  You'd want to be sure to hide all that with a big bow.

I didn't get a picture, so I'll see if I can get one after school.
 . . . . .
Okay, that hairstyle came home looking like a mess.  The tail was too heavy, and the bobby pins didn't stand a chance.  No use taking a picture with it looking like that.  Better try something like I said above next time.

Wednesday, March 16, 2011

Lesson 40: Braided Three-Leaf Clover

This style is the same general concept as this heart.  I gained some more inspiration from watching this You-Tube video for a similar style.  Part the hair and put in hairbands like so:
Turn them each inside out with a Topsy Tail, pulling through to the outside (backwards).
Split each tail into two equal sections and braid them.  Use mini clips or hairbands, as they will be taken out in a later step.
Gather all the braids together at the center of the head, forming heart shapes around each pull-through.  Secure them together with a hairband.  If your braids are clipped, be careful to pull the hairband over the clips so the don't get pushed off.  Brush the remaining hair into a ponytail.  Add the braids and band it all together.  Take out the clips or bands that are holding the braids, and brush out the end.
 If you want to make the clover leaves look fuller, you can use a bobby pin to connect the two braids together at the sides or use a mini clip.  You could try clipping the braids underneath to hide it, (then ask her if it is comfortable).
You could add a bow on the bottom if you want.  Happy St. Patrick's Day!

Tuesday, March 15, 2011

Lesson 39: Braided Shamrock with Celtic Weave

(Read all directions before attempting this one.)  To begin, part the hair diagonally from temple to shoulder.  Hold the bottom section in a clip or hairband.

You'll want to make another diagonal part to match on the other side, but just start with the top section and continue through later.  Put hairbands in to make piggies of these triangles.  They don't need to be really tight because you are going to do a pull-through (Topsy Tail).
Now continue the rest of the part down to the shoulder.  Put hairbands in these triangles, too.
Now use a Topsy Tail tool to turn these piggies inside out toward the middle X.  If you don't have the tool, you could do this step without it, but you will not be able to do a later step with your fingers.  You will need at least a long doll needle and thin ribbon or dental floss.
Here's the part for the weaving.  Give the tails a good spray of water (or hairspray) close to the hairbands and comb them smooth to help minimize little hairs (flyaways) from getting scooted backwards when you pull the weave tight.  Cross the left tail over the top tail.  Bring the bottom tail up over the left tail (to the right of the top tail).  Cross the right tail over the bottom tail (above the left tail).  Then use your Topsy Tail tool (or craft needle or fingers) to draw that right tail under the top tail.  Pull each tail gently to tighten up the weave.

If you want to get really fancy, you could divide each tail into two sections and make a weave with four on each side rather than just two.  If any of you choose to do this, please send a picture I could post and share with others.
Next you will make a braid out of each tail.  Make it more loose than tight, but not too loose.  Braid it pretty far down to not leave a long tail on the end of the braid.  Use two hairbands at different lengths if you need to.  They will be hidden.  Going around clockwise (or counterclockwise--just go in order), pull the end of the braid into its neighbors "burrow," or the place where the piggies curve in beneath the hairband.  Draw it through diagonally to come out the bottom along the part line.  If the hair is too short, that is fine, just hide it under the weave and pin it in with bobbies.
If yours turns out like mine, the weave is going to start looking kinda messy by this point.  Spray it again and use a stick (from a rat-tail comb or whatever) to smooth down the bumps and flyaways and try to tuck them back under the weave where they belong.
Now you've got to hide those little braid tails.  Do the same thing again that you did with the big braids, but this time, pull them in as far as they will go instead of leaving a loop.  Now stick bobby pins in, at least two at every corner making and X shape with the pins.
I discovered when I was doing this step that somehow I had left out a thin strand of hair when braiding the bottom tail.  I didn't want to go backwards because that probably would have made a mess of things, so I just curled it up with my curling iron and left it.  I think it actually gave it a nice touch.  More elegant.  And it was sort of like the stem.  So if you wanted to do it on purpose, just remember to pick out a little bit of hair during the braiding step.  Since I had the curling iron on anyway, I curled the tendrils she had hanging around her face and neck.  Here's another view before I smoothed out the weave (the best I could):
And the finished product:

Monday, March 14, 2011

Lesson 38: Front Half Pony with Clover

With St. Patrick's Day this week, I thought I'd add a couple clover hairstyles.  I'll try and get another one in later this week.
For this style, start with a front half pony.
Now you need to follow the directions for this heart style.  You are going to repeat the steps to make the small clipped heart twice more, but on the sides.  The second and third time, instead of taking a piece of hair from ponytail, use a comb to gather a sliver below the half pony.  It will be like a thin triangle.  The left heart will come from the right side triangle, and the the right heart will come from the left side triangle.
Each side of the first heart has a clip, but you will use the same clip for the sides of the clover that touch, for a total of four clips.