To help celebrate Valentine's Day, here's another heart shaped hairdo. Instructions are show for the ponytail version, but this is also really cute as pigtails. (This picture is from a long time ago!)
Begin with a front piggy. Put the rest of the hair in a low pony, being sure to leave the tail of the top one out.
Braid two sections of the lower ponytail at the sides. Make them as even thickness as you can. Secure the ends with a temporary clip.
Pull the braids up and then back down to add them with the hair of the top piggy.
Add an elastic here, careful to keep the braids at equal lengths on either side. Split the hair from the tail in half, and tuck them behind the braids.
The braids will make a C shape on either side. To get the sharper angle at the bottom of the heart, you can fold them up and add another elastic on top of the pinch.
The ends of the braids will be much shorter than the tail of the pony. If they pop out the sides like in the above picture and that bothers you, you can add this additional step. Pull the short ends together behind the ponytail. Wrap a small clear elastic around them a few times, and then once around to whole ponytail.
I'll admit this makes the bottom look kind of weird, but that can be hidden with a flower or bow. (Satiny flower clip from Gimme Clips!)
Click the Valentine's Day link on the right sidebar to see more Valentine's Day hairstyle ideas.
Showing posts with label pigtails. Show all posts
Friday, February 8, 2013
Braided Heart Ponytail
Friday, September 7, 2012
Belle's 1st Day of School
My little girl is a third grader now! Once when we moved in the middle of a school year, I gave her a star hairstyle to help her feel more confident meeting new friends, so she could remember she was a star! She asked for it again for her first day. I've posted our star before here.
The curls are from a curling iron.
Monday, July 30, 2012
Four Strand Rope Braid Pigtails
I learned how to do this braiding technique from Babes in Hairland. Her instructions are very clear and concise, so rather than reinvent the wheel, I will just direct you to her post. Click here to see her basic instructions for a 4 strand rope braid. This is different from 4 strand flat braid, which I intend to show later.
This post shows one way to use this braid. I've started out with a regular 3 strand braid with the bangs, and then divided the hair for pigtails. I started with a side part on top and angled it over to the middle at the crown of the head, and continued straight down the back. You can do the part with sharp angles or with rounded curves. Don't undo the little braid after you've put it into the pigtail. It adds an interesting detail to the 4 strand braid. Braid both sides, and then add embellishments like these flowers from Gimme Clips or a ribbon or whatever.
Wednesday, September 7, 2011
Lesson 71: Woven Twists
I've been super busy lately and haven't had much time for blogging. This is the best I can do today.
This is really similar to Princess Hairstyle's woven piggies. It's one of my favorites. I simplified it a bit with six twists instead of eight and pigtails instead of messy buns. Also there is a side part instead of a center part. Click on the link above for more detailed instructions from PH.
Thursday, July 7, 2011
Lesson 58: Star with Ribbon
Belle's 4th of July style this year was a star with ribbon over it. Follow the directions for the twisted star. Then slip the end of a long ribbon through a loop of each elastic. Begin with a bottom piggy, leaving an end a few inches long. Next the top middle, then the other bottom piggy, across to the other side on top, then straight across to the other top side, and back down to the bottom where you began. You can leave the ends loose or tie them into a bow. I used several pieces of ribbon to tie bows around each piggy. You could also use clip bows or flowers.
Saturday, July 2, 2011
Lesson 57: Twisted Star Hairstyle
I learned the basic technique for the star from Princess Hairstyles. It has become one of our favorites, and we do it often around Independence Day (4th of July) and Christmas. Thank you, thank you, Princess Hairstyles! Rather than reinvent the wheel here, I just want to show a little how I've tweeked it for my own preference. Please look at the link above to get the step by step.
If you can see it in the picture, I have changed the shape of the parts. The Princess has a triangle shape section of hair with the point at the forehead. Belle's triangle shape has the point at the back. Another difference is the placement of the hairbands at the sides. Rather than pull the hair together in the middle of the section, I have put the hairband along the part. The part then sort of fills in for the fifth missing side of the star.
Instead of doing hawser twists, I've just twisted each section. It won't hold on its own with hairbands, so you have to use clips to stick them to the bottom piggy until you get the hairband over it. Also, if you twist the two pieces from the middle top section in the same direction, you might have a problem with the hairband rolling over. If that happens, you can twist the two pieces in opposite directions.
Here's another shot when we've done it with braids. It is a little more difficult to recognize that it is a star this way, but still an interesting and fun style.
Labels:
braids,
Christmas,
Independence Day,
pigtails,
rolled twists
Tuesday, June 28, 2011
Lesson 56: Braid Cross with Fountains
It has been a year and a half or so since I took this picture of Belle. Her hair has grown out a bit so now it doesn't look so cute to do this style, but I'll give you the how-to anyway. Begin by parting the hair across the middle from ear to ear and tying the back section temporarily. Part the top straight back from the forehead, and braid the two front sections.
Now part the back down the middle to make pigtails. Use thinner hairbands because you will be adding multiple bands and don't want it to get too bulky. I used different colors just for demonstration, but it is better to use all the same color.Cross the braids and add them into the pigtails. Add another elastic on top. You can then scoot the first elastic out and remove it or just leave it.
Undo the braided tails then rebraid including the rest of the hair in the piggy.Fold the braids up and attach the ends with the top of the pigtails. Add another hairband or tuck it into the hairband that is already there if you can.
Here's the magic trick that makes this style unique: Use a mini claw clip to stick the bottoms of the braids together. Hide it in the back so it is not easy to see. It's best to use clear or one the same color as the hair.
Last, spray the tails that are sticking out with water to shape them how you want, and let them air dry.
Monday, June 6, 2011
Lesson 53: Woven and Braided Buns
On my style request post "Ryan Family" asked for a tutorial for this braided bun, which is actually a hairpiece you put over top of your own (short hair ponytail or small bun). This is what I came up with. It doesn't look exactly the same, but I still love it. Belle reminded me of a Japanese anime cartoon when it was done. The weaving part is sort of complicated, but a braided bun can be done without the weaving just by braiding the ponytail (one braid or more) and wrapping the braids around and tucking in the ends with bobby pins.
(Once again, pardon the weird pictures--my software is pretty old, and I can't update it anymore.) Put the hair in pigtails. Or you could just do one bun at the back.
Divide the pigtail into four equal size sections.
Now comes the weaving part. Bring the top left section (red lines in the pictures below) over the bottom left section, but keep a loop hole open in it for later on.
Cross the bottom left section (yellow) over the top one you just brought down and over the bottom right section (green).
Take the bottom right section (green) up over the one you just crossed (yellow) and over the top right section (blue).
Cross the top right section (blue) over the one you just brought up and then tuck it into the loop you've been saving open from the first strand (red).
Now pull all the tails to tighten up the weave.Braid all the tails as far as you can go and add clear elastics.
Wrap a braid around the whole thing, looping until you run out of hair. Tuck in the tail and pin it in place with a bobby pin or two.
Repeat the wrapping around step with every braid. Add more bobby pins if anything sticks out. Repeat for the other piggy.
If you really prefer the look of one big braid around the whole thing with the weave in the middle, I suppose it could be achieved by doing sort of a french braid around the weave instead of braiding each strand. I haven't tried it. If you try it and get some success, I invite you to email a picture, and I'll post it.
Wednesday, December 1, 2010
Lesson 25: Hawser rope (twist braid)
Hawser rope is a kind of rope used to tie up or tow boats. Beginners look at this and think there is no way it will stay without falling out straight. The trick is to twist the strands and then wrap them together in the opposite direction.
For today's style, I gave Belle a zigzag part in front. A straight middle part would work well. If I were to do a straight side part, there would be a thicker rope on one side than the other. Since Belle has a cowlick in front, it doesn't work well to do a middle part, but the zigzag gave me an even amount of hair on both sides. Make a straight part from ear to ear and tie the back section into a ponytail.
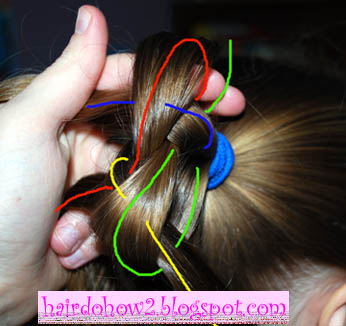
Begin by dividing the hair on one front side into two equal sections.For today's style, I gave Belle a zigzag part in front. A straight middle part would work well. If I were to do a straight side part, there would be a thicker rope on one side than the other. Since Belle has a cowlick in front, it doesn't work well to do a middle part, but the zigzag gave me an even amount of hair on both sides. Make a straight part from ear to ear and tie the back section into a ponytail.
Twist the sections each in the same direction. I twisted the the left.
Now twist them together in the other direction. I twisted them to the right.
Continue twisting them together, making sure the strands are twisted as you go. If you twist them together without twisting the individual strands, it will just fall loose at the end.
The tighter you twist the strands, the better the rope will stay together.
Continue down to the end. Put in a hair band. (I actually just used a temporary clip for this style.)
The twist will probably loosen up a little when you let go.
You can tighten it up again by turning it if you are going to stick them into another section of hair. This is an idea for a hairstyle here, if you do hawser ropes on both sides and them attach them to the ponytail with another hairband.
I didn't want to do that today, though, so I let the ropes fall while I parted the back into pigtails.
Next I tightened up one rope and stuck it in with the opposite side pigtail.
And repeated on the other side. You can see this leaves some shorter tails in the piggies. You could curl them, braid them, or do another hawser rope on the ends. I just left them today.
Subscribe to:
Posts (Atom)