In all the hustle and bustle of the day, I didn't get a good shot of Belle's hairstyle for Halloween. It was so cute, though! I did two dutch braids and then folded the ends over each other and tucked in the ends to make something like a wide braided bun at the bottom. I may have to do this style again and post it.
I didn't have time for sewing this year, but we pulled it off with a hand-me-down dance costume from my niece, some gorgeous and gigantic butterfly wings from Jo-Ann Fabrics, and several borrowed parts to make a pirate. I have really nice neighbors.
We handed out glow-in-the-dark fangs and bugs, pencils, lip gloss, and mini card games. No candy! Lots of the kids were very excited to get something besides candy. One even said, "This is the coolest house ever!" Now is the time to get some of this stuff on clearance and save it for next year.
Showing posts with label Halloween. Show all posts
Thursday, November 8, 2012
Tuesday, October 9, 2012
Disney's Beauty and the Beast Belle Hairstyle
Begin with damp hair. You can add some styling product such as gel or mousse at this point. Comb it all back straight.
Using a hairdryer, blow the bang area hair back while using a comb to train the hair to go where you want it.
Comb back, and then push the comb forward to form a bump. Add some hairspray. You can continue to blow it a bit, perhaps on low or with a diffuser if your hairdryer's high setting blows the hair all over the place and out of the comb.
Use a comb or brush to blow out the sides sections over the ears. Use the same technique as you did with the top.
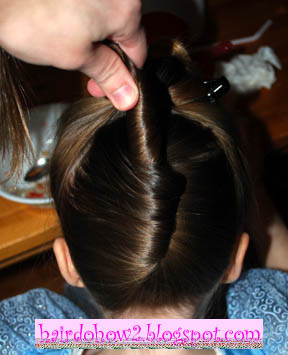
Part the hair in the middle. If you do not have cut bangs, you could try to get a poof by adding a bobby pin in this place after lifting and pushing the hair forward.
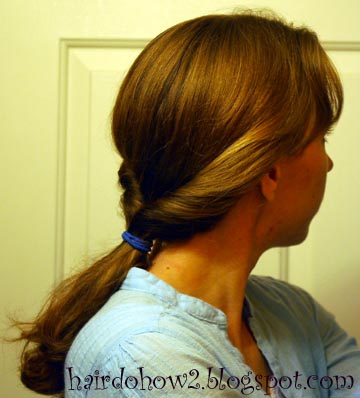
Take the side section and brush it toward your face. Hold it out and twist it loosely.
Pull it back against your head...
...and then push it upwards. Add a bobby pin to hold it down. This is done in a similar way to the Dorothy hairstyle. (This is a nice finished style for a regular day.)
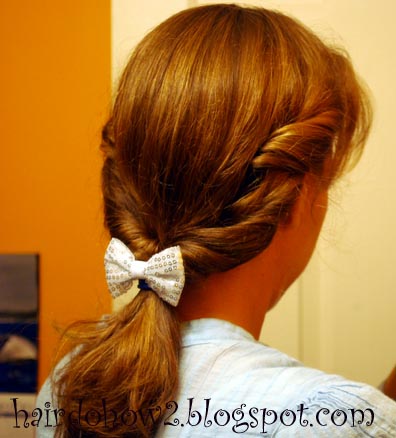
Repeat on the other side. Brush down the hair at the back of the head so it is smooth. Now roll up loosely the hair that is at the bottom side.
Repeat on the other side, then put them together.
The twist will be laying over some hair from the back of the head. It may be necessary to add some of this hair into the twists, if you can manage it. You may need to ask for someone's help to hold one of the twists for you while you work on the other. Add an elastic around the whole thing.
To get some more poof, gently pull out some of the hair at the edges of the roll.
Add a bow. You can tie a ribbon to make a bow or add a bow clip. (Mine are Gimme Clips--these will be coming out to Associated Food Stores, but there isn't a blue one.)
For a more everyday look, after I took these photos, I undid the whole thing, brushed it through (especially to settle down my bangs), and twist the sides in one step instead of two, and without trying to get the extra volume.
Monday, September 17, 2012
Dorothy Gale Hairstyle (Wizard of Oz)
When I was a little girl, The Wizard of Oz would come on TV every once in a while on a holiday. I loved watching it with my family. I always thought Judy Garland was gorgeous. I once heard a rumor that Shirley Temple was considered for the part of Dorothy. Certainly this wouldn't have been her hairstyle.
Start with a part down the center. (I've altered it a bit here to accommodate for Belle's front side cowlick by beginning the part at the side and curving it to the middle for a centered part at the back.) Clip one side of hair out of the way temporarily. Starting at the forehead, make a rolled twist to about 3/4 of the way down the side. Twist the hair, and gradually add in more and more as you go down, using a comb to smooth it out along the way if you need to.
Insert a bobby pin at the bottom (going toward the top) so that the last bit of hair to be twisted back is stuck down with the hair at the scalp. Make sure the pin is hidden within the roll of hair. If you look carefully in this picture, you can see where I'm putting the bobby pin (I use two hands when I'm not holding the camera!)
For the last half, you will french braid. Using the twist and some new hair from the side, you'll get your first two sections for braiding.
Gather up the third section from the top.
Continue french braiding. Fasten it off when you are a couple inches down, leaving long tails you can curl. Repeat on the other side, and add bows, if you like.
Belle wore this as an everyday hairstyle, so I skipped the bows and curls. I don't know if this is exactly how Ms. Garland wore hers in the movie, but this is what it looks like to me.
Wednesday, August 22, 2012
Barbie in a Mermaid Tale 2 Cover Hairstyle/ Half French Braid
This hairstyle is from the movie cover of Barbie in a Mermaid Tale 2. This tutorial is for an everyday realistic hairstyle, but if you are going for it to look just like the cover, there are a few changes that I'll tell about at the bottom of the post.
To start, make a part over the top of your head from ear to ear. Pull the back hair out of the way into a temporary ponytail. The front half is going to be a half french braid. To do a half french braid, you should know how to do a regular french braid first. This will be like that, but you only add hair to one side. When you add the hair in, gather a new section all the way back to the part, and cross it over the middle strand.
Then cross the back strand over the middle without adding any hair to it.
When you run out of hair to add in, keep braiding down.
You can put it into a side ponytail for a variation.
If you are trying for the authentic "just like the picture" style, leave some hair out at the front for long side-swept bangs. If you want pink hair, you can use an extension clip or color your hair with dye, markers, or pastels (girls, ask your mom first!). You will also want to curl the ends a bit with a curling iron, but not the pink extension or it will melt. And of course, don't forget the tiara on top. (If it's for Halloween and you don't have really long blonde hair, you could do this style on a wig, but don't use a curling iron or it will spoil the wig and the curling iron. Boil the hair like in this post.)
Wednesday, July 18, 2012
Annie Get Your Gun Braids
If you haven't seen Annie Get Your Gun yet, I suggest you do. It's an old classic musical about Annie Oakley (historical fiction, I guess). My favorite song is "Anything You Can Do" (I can do better). It makes me laugh out loud.
This hairstyle is from the beginning of the movie before Annie has been "refined." If anyone can teach me how to do that classic 1940's curly bob--the after--I would love to learn.
Here Belle's hair is longer than in the movie, but you get the idea. Braid the front into two braids. Tie the ends of the braids with long rags rather than elastics. Use the center of the rag to leave two tails hanging. You could tie them up higher than what I did.
Part the rest of the hair down the middle. Braid each side, including the top braids into one of the sections.
When you get down to the part with the rag, split the rag tails so that they each go into a different section of the braid. Continue braiding.
Tie off the braid by wrapping one of the rag tails around the braid and then tying it in a bow with the other rag end.
This would be fun for a Halloween costume. It's easy and cute for every day, but if you want it to look a little more refined, you could use ribbon instead of rag strips. Satin ribbon will not hold the knot, though, so you will have to use elastics for that, and tuck the ribbon into the elastic.
Wednesday, October 19, 2011
Lesson 78: Worm Bun/ The Brain
This style is fun to do. I gave it a gross name for Halloween, but it would actually be cute for a flower girl or other special occasion with little flowers or ribbons stuck in it.
Begin with a ponytail. Divide the tail into a few sections. I used four, but if you use more the twists will be thinner and give it a more detailed brain/worm effect. Twist each section all the way to the end, and then keep twisting it tighter and tighter until it starts to curve and make loops. Tuck the end into the hair band.
Repeat until you have used up all the hair. Pull the ends that are sticking out underneath the twisties, and pin them in place with bobby pins. Arrange the loops however they look nice, and then pin them down nice and neat.
Labels:
buns,
easy,
Halloween,
rolled twists,
special occasion
Thursday, October 6, 2011
Halloween Requests?
With Halloween approaching, I am wondering if there is anybody out there that needs specific help on a costume hairdo. I can't promise anything, but just leave a comment and I'll see what I can do.
Wednesday, July 27, 2011
Lesson 63: Disney's Cinderella Hairstyle
This is Halloween 2009. Belle is obviously dressed as Cinderella. Sweetheart (not so obvious) is Calvin and Hobbes. It has been some time since I did her hair, so I don't know exactly how I did it that day, but I've tried to recreate it here for you. In the picture above, I actually had bought a headband and covered and stitched it with fabric to make it blue (since I couldn't find a blue one in the store). She lost it at school, so this tutorial is showing another headband that has a huge bow on. it That's not quite appropriate for Cinderella, but it's the best we've got now. And yes, I know it isn't Halloween yet, but perhaps your little princess likes to play dress-up...
To begin, put the front half of the hair in a pigtail with the elastic at the part (elastic is not temporary) and twist it up and clip it out of the way temporarily. Gather the back half of hair as if to put it into a low ponytail.
Begin twisting the hair.
Pull the tail upwards as you continue to twist.
Keep twisting. You may need to make some minor adjustments to the hair that is going to start pulling over the top of the twist by shaking the tail gently or using a comb to guide it across smoothly.
Keep twisting (and adjusting it if necessary) until the hair rolls over all the way up to the part.Now put an elastic in at the top to keep it rolled up.
Undo the clip in the front. You now have two tails sticking out at nearly the same place. Next you will roll and wrap one of the tails around the other (it shouldn't matter which) to make a bun with a tail sticking out the middle. Pin it in place.
Now add the headband.Take the tail that is left and loop it around like this:
Keep rolling into the loop until all the ends are in a circle.
Lay the loop down (sideways or up and down) across the headband and pin it in place.This could make an elegant up-do for a special occasion if you just left out the headband.
Labels:
Disney,
Halloween,
rolled twists,
special occasion,
up-dos
Subscribe to:
Posts (Atom)