Showing posts with label rolled twists. Show all posts

Tuesday, October 9, 2012

Disney's Beauty and the Beast Belle Hairstyle

One of our facebook fans requested a tutorial for Belle from Beauty and the Beast for a Halloween hairstyle.  This is her hairstyle in her everyday clothes, not the fancy yellow ball gown. This is what I came up with.
Begin with damp hair. You can add some styling product such as gel or mousse at this point.  Comb it all back straight.
Using a hairdryer, blow the bang area hair back while using a comb to train the hair to go where you want it.
Comb back, and then push the comb forward to form a bump.  Add some hairspray.  You can continue to blow it a bit, perhaps on low or with a diffuser if your hairdryer's high setting blows the hair all over the place and out of the comb.
Use a comb or brush to blow out the sides sections over the ears.  Use the same technique as you did with the top.
Part the hair in the middle.  If you do not have cut bangs, you could try to get a poof by adding a bobby pin in this place after lifting and pushing the hair forward.
You can use a round brush with your hairdryer to try and get some more volume out of the sides.
Take the side section and brush it toward your face.  Hold it out and twist it loosely.
Pull it back against your head...
...and then push it upwards.  Add a bobby pin to hold it down.  This is done in a similar way to the Dorothy hairstyle.  (This is a nice finished style for a regular day.)
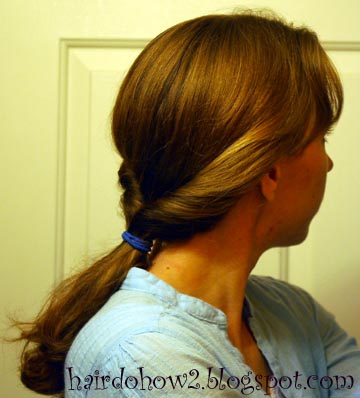
Repeat on the other side.  Brush down the hair at the back of the head so it is smooth.  Now roll up loosely the hair that is at the bottom side.
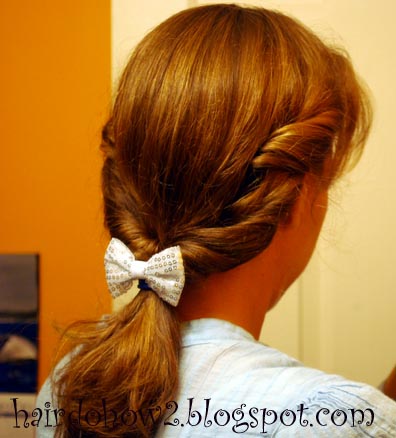
Repeat on the other side, then put them together.
The twist will be laying over some hair from the back of the head.  It may be necessary to add some of this hair into the twists, if you can manage it.  You may need to ask for someone's help to hold one of the twists for you while you work on the other.  Add an elastic around the whole thing.
To get some more poof, gently pull out some of the hair at the edges of the roll.
Add a bow.  You can tie a ribbon to make a bow or add a bow clip.  (Mine are Gimme Clips--these will be coming out to Associated Food Stores, but there isn't a blue one.)

For a more everyday look, after I took these photos, I undid the whole thing, brushed it through (especially to settle down my bangs), and twist the sides in one step instead of two, and without trying to get the extra volume.

Monday, September 17, 2012

Dorothy Gale Hairstyle (Wizard of Oz)


When I was a little girl, The Wizard of Oz would come on TV every once in a while on a holiday.  I loved watching it with my family. I always thought Judy Garland was gorgeous.  I once heard a rumor that Shirley Temple was considered for the part of Dorothy.  Certainly this wouldn't have been her hairstyle.

Start with a part down the center.  (I've altered it a bit here to accommodate for Belle's front side cowlick by beginning the part at the side and curving it to the middle for a centered part at the back.)  Clip one side of hair out of the way temporarily.  Starting at the forehead, make a rolled twist to about 3/4 of the way down the side.  Twist the hair, and gradually add in more and more as you go down, using a comb to smooth it out along the way if you need to.
Insert a bobby pin at the bottom (going toward the top) so that the last bit of hair to be twisted back is stuck down with the hair at the scalp.  Make sure the pin is hidden within the roll of hair.  If you look carefully in this picture, you can see where I'm putting the bobby pin (I use two hands when I'm not holding the camera!)
For the last half, you will french braid. Using the twist and some new hair from the side, you'll get your first two sections for braiding.
Gather up the third section from the top.
Continue french braiding.  Fasten it off when you are a couple inches down, leaving long tails you can curl.  Repeat on the other side, and add bows, if you like.
Belle wore this as an everyday hairstyle, so I skipped the bows and curls.  I don't know if this is exactly how Ms. Garland wore hers in the movie, but this is what it looks like to me.

Friday, September 7, 2012

Belle's 1st Day of School

My little girl is a third grader now!  Once when we moved in the middle of a school year, I gave her a star hairstyle to help her feel more confident meeting new friends, so she could remember she was a star!  She asked for it again for her first day.  I've posted our star before here.
The curls are from a curling iron.

Monday, August 6, 2012

S-Shaped Bun

This bun reminds me of the little angular figure 8 doodle I used to see everybody drawing in high school.
Begin with two piggies, one on top of the other.  Put the elastic of the top one right at the edge of the part so that the part will not show.
Split each of the tails into two sections.  Twist one of the sections and wrap it around the elastic, tucking in the loose ends.  Bobby pin in place.  Repeat for other piggy.
Twist the remaining tail of the top bun.  Drop it down to the bottom bun and wrap it around the outside of the other bun.  Tuck in the ends, and pin in place.
Twist the last tail. Pull it up and around the top bun.  Tuck in the ends and pin.
All twists should be done in the same direction, whether it be clockwise or counterclockwise.

Tuesday, June 19, 2012

French Twist with You-Pins

I am excited to share my new favorite hairstyle to do on myself.  It is elegant enough for a special occasion, yet fast enough for an every day do.  After a little bit of practice, it is really quick to put up.  I am using You-Pins from Lilla Rose.  They are beautiful pins with two prongs about the length of my finger.  They are malleable enough to bend somewhat to shape for a comfortable fit, but quite sturdy, and they hold a surprising amount of hair in place.  Belle and I chose the sparkly stars as our favorite, and this will be a fine hairstyle for the Fourth of July.  (This post is going to have a lot of labels!)
Begin as you would for a low ponytail.  I started here at the corner of my head to keep the roll at the center of the head.
Grab the hair from underneath, and begin to twist it.
Pull the tail upwards and continue to twist.
Twist upwards, tightening the inside of the twist by pulling the inside hair with the other hand.
Pull the ends of the tail over to one side, away from the crevice. Insert a You-Pin at the edge at the top of the roll.  The curve of the pin should be opposite of the curve of your head at this point.
Roll the pin over to the side and push it in against the scalp.
Insert another You-Pin the same way a little bit lower.  With practice, these two pins are enough to keep the whole thing in place.  If you have trouble keeping it all together, you can add a bobby pin or two down through the top, or a spin pin.  Also, if your roll angles to the side like in the above photo (which, by the way, was taken by five year old Sweetheart, and I couldn't see what I was doing without my mirrors), try starting the ponytail on the opposite bottom corner and rolling up as if to the opposite temple rather than straight up.

Tuesday, June 12, 2012

Half-dutch Headband with Twists into Messy Bun and Variations

Here is a style that I had put in my gallery when my blog was rather new, but never did the step by step directions until now.  It's in my banner, too.
Begin with a part at the back of the ears across the top of the head.  Put the back hair into a ponytail.
Part a strip from the top of the ears across the top, maybe an inch and a half thick or so.  Get the front hair out of the way with a clip.
Do a half dutch braid ending at the side of the head, meaning that you add in all the rest of the from above the ear  before you actually get down to the ear.  Then braid to the end.
Pull the braided tail over the top of the hairband.  Twist the bang section and draw it up over the ponytail, clipping it in place temporarily.  You may have to twist part of the hair and then add a little more to it while you keep twisting to get it to look right.
Twist the other side and bring it up over the pony.
Add another elastic over the whole thing.
You can leave it like this. I think it looks nice this way.  Or turn the back into a messy bun.  You can leave the braid in or take it out.
Here are some old pictures from when I did it a long time ago.  On the smaller side I did a regular braid instead of another twist.

Here is another variation with the same general instructions, you just do a hawser twist instead of the half dutch and simple twist.  This also just has a fancy hairband on a ponytail instead of a messy bun.