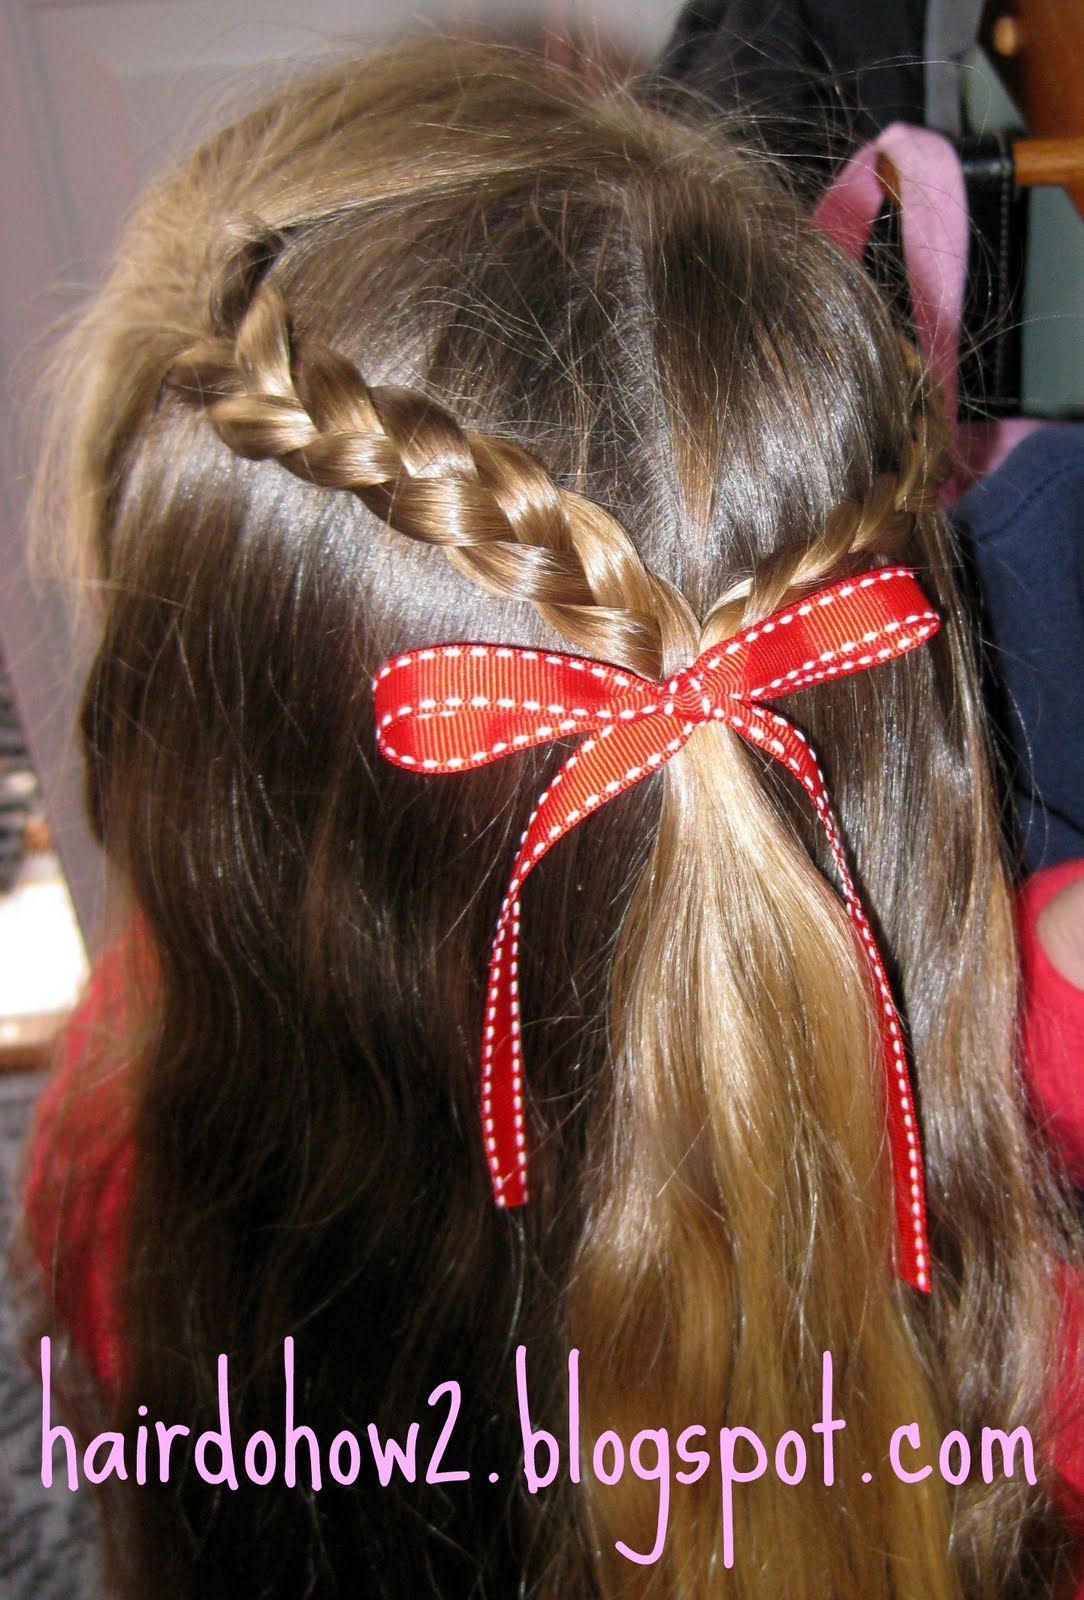
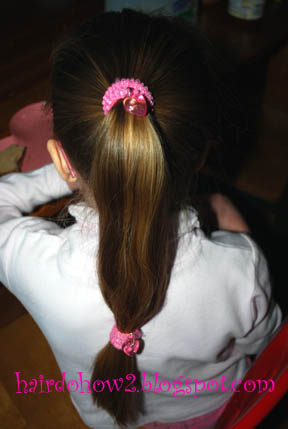
This is a super easy style. Start with a ponytail. Braid the top loosely, and then pull out the edges of the plaits to widen it. Gradually braid tighter to the end. This style probably would work better with very curly or kinky hair since you can braid further out to the ends without worrying about the ends popping out.
(I'm experimenting with some new software that came with my camera. I doesn't do much, so I need to keep searching for that old disk... This image is huge, and I can't put my blog stamp on it.)
Showing posts with label fast. Show all posts
Thursday, May 23, 2013
Thursday, February 21, 2013
Milkmaid Braids
I've already posted a different version of the milkmaid braids here, but I wanted to do this one that's a little different for shorter hair.
As you can see in the picture, you don't cross the braids over the back like the other post, but braid above the ears and pull them straight up. I fastened off the end of the braid with a clear elastic, and then added another clear elastic down from the first to keep the ends of the tail from fraying out as much.
You have to draw the braids up together and then use bobby pins to hide each tail under the other braid. It helps if your braids are loose and wide so you can spread them out flatter and make more room for the tails to hide.
You can see the elastic just a bit here. It would help if her hair were maybe an inch longer.
As you can see in the picture, you don't cross the braids over the back like the other post, but braid above the ears and pull them straight up. I fastened off the end of the braid with a clear elastic, and then added another clear elastic down from the first to keep the ends of the tail from fraying out as much.
You have to draw the braids up together and then use bobby pins to hide each tail under the other braid. It helps if your braids are loose and wide so you can spread them out flatter and make more room for the tails to hide.
Wednesday, October 3, 2012
Braid Rose
This is a really easy but really cute hairstyle. Just gather a section of hair near the forehead, braid it down to the end, add an elastic, and then coil it up. Tuck the tail underneath, and put in a few bobby pins to hold it in place.
Wednesday, July 18, 2012
Annie Get Your Gun Braids
If you haven't seen Annie Get Your Gun yet, I suggest you do. It's an old classic musical about Annie Oakley (historical fiction, I guess). My favorite song is "Anything You Can Do" (I can do better). It makes me laugh out loud.
This hairstyle is from the beginning of the movie before Annie has been "refined." If anyone can teach me how to do that classic 1940's curly bob--the after--I would love to learn.
Here Belle's hair is longer than in the movie, but you get the idea. Braid the front into two braids. Tie the ends of the braids with long rags rather than elastics. Use the center of the rag to leave two tails hanging. You could tie them up higher than what I did.
Part the rest of the hair down the middle. Braid each side, including the top braids into one of the sections.
When you get down to the part with the rag, split the rag tails so that they each go into a different section of the braid. Continue braiding.
Tie off the braid by wrapping one of the rag tails around the braid and then tying it in a bow with the other rag end.
This would be fun for a Halloween costume. It's easy and cute for every day, but if you want it to look a little more refined, you could use ribbon instead of rag strips. Satin ribbon will not hold the knot, though, so you will have to use elastics for that, and tuck the ribbon into the elastic.
This hairstyle is from the beginning of the movie before Annie has been "refined." If anyone can teach me how to do that classic 1940's curly bob--the after--I would love to learn.
Here Belle's hair is longer than in the movie, but you get the idea. Braid the front into two braids. Tie the ends of the braids with long rags rather than elastics. Use the center of the rag to leave two tails hanging. You could tie them up higher than what I did.
Part the rest of the hair down the middle. Braid each side, including the top braids into one of the sections.
When you get down to the part with the rag, split the rag tails so that they each go into a different section of the braid. Continue braiding.
Tie off the braid by wrapping one of the rag tails around the braid and then tying it in a bow with the other rag end.
This would be fun for a Halloween costume. It's easy and cute for every day, but if you want it to look a little more refined, you could use ribbon instead of rag strips. Satin ribbon will not hold the knot, though, so you will have to use elastics for that, and tuck the ribbon into the elastic.
Tuesday, June 19, 2012
French Twist with You-Pins
I am excited to share my new favorite hairstyle to do on myself. It is elegant enough for a special occasion, yet fast enough for an every day do. After a little bit of practice, it is really quick to put up. I am using You-Pins from Lilla Rose. They are beautiful pins with two prongs about the length of my finger. They are malleable enough to bend somewhat to shape for a comfortable fit, but quite sturdy, and they hold a surprising amount of hair in place. Belle and I chose the sparkly stars as our favorite, and this will be a fine hairstyle for the Fourth of July. (This post is going to have a lot of labels!)
Begin as you would for a low ponytail. I started here at the corner of my head to keep the roll at the center of the head.
Grab the hair from underneath, and begin to twist it.
Pull the tail upwards and continue to twist.
Twist upwards, tightening the inside of the twist by pulling the inside hair with the other hand.
Pull the ends of the tail over to one side, away from the crevice. Insert a You-Pin at the edge at the top of the roll. The curve of the pin should be opposite of the curve of your head at this point.
Roll the pin over to the side and push it in against the scalp.
Insert another You-Pin the same way a little bit lower. With practice, these two pins are enough to keep the whole thing in place. If you have trouble keeping it all together, you can add a bobby pin or two down through the top, or a spin pin. Also, if your roll angles to the side like in the above photo (which, by the way, was taken by five year old Sweetheart, and I couldn't see what I was doing without my mirrors), try starting the ponytail on the opposite bottom corner and rolling up as if to the opposite temple rather than straight up.
Begin as you would for a low ponytail. I started here at the corner of my head to keep the roll at the center of the head.
Grab the hair from underneath, and begin to twist it.
Pull the tail upwards and continue to twist.
Twist upwards, tightening the inside of the twist by pulling the inside hair with the other hand.
Pull the ends of the tail over to one side, away from the crevice. Insert a You-Pin at the edge at the top of the roll. The curve of the pin should be opposite of the curve of your head at this point.
Roll the pin over to the side and push it in against the scalp.
Insert another You-Pin the same way a little bit lower. With practice, these two pins are enough to keep the whole thing in place. If you have trouble keeping it all together, you can add a bobby pin or two down through the top, or a spin pin. Also, if your roll angles to the side like in the above photo (which, by the way, was taken by five year old Sweetheart, and I couldn't see what I was doing without my mirrors), try starting the ponytail on the opposite bottom corner and rolling up as if to the opposite temple rather than straight up.
Thursday, May 24, 2012
Funky Braids
This style is fun, easy, and pretty fast. Great way to spice up an ordinary style. This makes me miss Belle's long hair! This was a long time ago. To start, gather a small section of hair at the bang area and make a thin braid. Add a clear elastic. Part the hair down the middle. Do Indian braids for just a couple inches (adding the small braid into one side), and then add an elastic. Add another elastic a bit farther down, careful that the little braid lays on top of the smooth hair. Braid the ends with an upside down braid, and add the last elastics.
Saturday, March 17, 2012
Lesson 99: Braid Loop Bangs
This one is a simpler version of this.
Section off a rectangular portion of hair at the top of the head. Gather the hair into a pigtail at the corner and add an elastic. Braid the hair to the end, and add another elastic. Draw the tail up to the top and fasten it to the first elastic by tucking it in or adding another elastic around the whole thing. Wrap the loose hairs around and tuck them into the elastic. Cover up the elastics with a flower or bow. (This is my favorite one again from Gimme Clips--the one that came with the headband.)
Thursday, March 15, 2012
Lesson 98: Simple St. Patrick's Day
Last year for St. Patrick's Day I posted some more challenging styles for making shamrocks and clovers out of hair (see the right side bar). This year we're keeping it simpler with some less time and skill intensive styles.
First, this little clover looking flower is from Gimme Clips. (Clover flowers are really purple and white, I know, but we need green to avoid the pinching, right?) The flower is sewn onto a small hairband. This was our Daylight Savings Church Day hairstyle (with a blue one that day). Just make a side part, and then part out a small section from the top of the head to the temple. Add the hairband, being careful not to get the petals stuck under the hairband twists.
This picture was taken before school one day this week, then I looked out the window and noticed it was windy, so I added some Indian braids (upside down) with the matching hairbands that came with the flowers.
Here's another way to green up a regular hairdo. Tie some green ribbon into a bow around the end of a bobby pin and insert it into a bun or messy bun.
Keep scrolling down. I put up two posts today.
First, this little clover looking flower is from Gimme Clips. (Clover flowers are really purple and white, I know, but we need green to avoid the pinching, right?) The flower is sewn onto a small hairband. This was our Daylight Savings Church Day hairstyle (with a blue one that day). Just make a side part, and then part out a small section from the top of the head to the temple. Add the hairband, being careful not to get the petals stuck under the hairband twists.
This picture was taken before school one day this week, then I looked out the window and noticed it was windy, so I added some Indian braids (upside down) with the matching hairbands that came with the flowers.
Here's another way to green up a regular hairdo. Tie some green ribbon into a bow around the end of a bobby pin and insert it into a bun or messy bun.
Keep scrolling down. I put up two posts today.
Monday, February 6, 2012
Lesson 93: Half Pony with Hawser Twist
Here is a simple hairstyle for every day. Since my hair is too short (plus I'm too old) to put fancy braided hearts in, I'll decorate for Valentine's Day with my heart flexi-clip from Lilla Rose.
I've taken the front section of hair near my forehead, twisted it up, and put a clear elastic in. Then I pulled up the front half of the rest of my hair, adding in the twist, and then held it together with the flexi-clip. This one is size small. The elastic is hidden behind the clip. If yours hangs down below where you can see, you can undo the elastic.
Tuesday, January 3, 2012
Lesson 85: Using Headbands
This is my sweet little Belle about two years ago. This headband is a stretchy fabric loop. To get it in, you have to pull the whole thing over the head around the neck like a necklace, pull the hair out and over the band at the back, and then scoot it back over the forehead. For a hard headband, put the ends over the ears as if you were putting on glasses, and then push it back over the forehead.
Honestly, I am not a big fan of headbands right now because they fall out so frequently, and also because the space above Belle's ears is already taken up by her glasses. I was the headband queen when I was in grade school, and wore headbands all the time, but they are frustrating unless you can find one that really fits your head. If they curve of the headband is different from your head, it can fall out or give you spot headaches. I know they have been making new ones lately that are rubbery and stretchy so they should stay in place better and mold to the shape of your head better. We haven't bought any of those. Have you? What's your opinion?
Lots of people are using the headbands like the white one in the middle of this picture on babies with ginormous flowers almost bigger than the baby's head. (Belle wouldn't let me put anything on her head until she was almost two, though I never tried anything when she was a newborn.) I used to tie the back side with a rubber band (fold it in half, then tie the ends around) to scrunch it up. That way it didn't lift up the hair at the back of her neck to make an arch poking through the other hair that's laying over it.
There are several tricks you can do to keep headbands in involving braids, tiny pigtails and pull-throughs, etc. My favorite headband is the kind from Gimme Clips that has the loop on it so you can clip in a flower. You can also use the loop to slide in a bobby pin to hold it down.
Honestly, I am not a big fan of headbands right now because they fall out so frequently, and also because the space above Belle's ears is already taken up by her glasses. I was the headband queen when I was in grade school, and wore headbands all the time, but they are frustrating unless you can find one that really fits your head. If they curve of the headband is different from your head, it can fall out or give you spot headaches. I know they have been making new ones lately that are rubbery and stretchy so they should stay in place better and mold to the shape of your head better. We haven't bought any of those. Have you? What's your opinion?
Lots of people are using the headbands like the white one in the middle of this picture on babies with ginormous flowers almost bigger than the baby's head. (Belle wouldn't let me put anything on her head until she was almost two, though I never tried anything when she was a newborn.) I used to tie the back side with a rubber band (fold it in half, then tie the ends around) to scrunch it up. That way it didn't lift up the hair at the back of her neck to make an arch poking through the other hair that's laying over it.
There are several tricks you can do to keep headbands in involving braids, tiny pigtails and pull-throughs, etc. My favorite headband is the kind from Gimme Clips that has the loop on it so you can clip in a flower. You can also use the loop to slide in a bobby pin to hold it down.
Tuesday, December 20, 2011
Product Review: Lilla Rose Flexi-Clips
These hair clips remind me of my mother's old "stick barrette" that she used to wear a lot in the 80's. It was an egg shape piece of thick leather with a hole punched in both ends for the wooden stick to go through. She did the "tails up" style with it.
At last I have found a solution to the problem of heavy hair wrecking the cascading curls style. Follow the directions for this post, but then add a flexi-clip above the pull-through for added stability.
I like these hair clips because they are useful for common every day hairstyles. They are quick and easy and make a simple style look nice.
Thursday, August 25, 2011
Lesson 70: Princess Braids
I found this picture from a long time ago and can't believe I haven't posted it yet. It is super simple--a good idea for a quick school day hairstyle.
For the style, divide the top hair into two sections, either parting in the middle or on the side. Braid each and secure temporarily. Join them together with an elastic, then let out the ends. Add a bow or flower. Super easy.
Thursday, August 11, 2011
Lesson 67: Island Princess Barbie Hairstyle
It's a braid. Duh, right? Just put a flower on it. See Barbie Gallery number 2. Something new to try, though: Put all the hair in a ponytail, braid the tail, then remove the hairband you put in for the ponytail. I'm playing around with this idea to work out some new styles. If the sides poof out on you, try doing the whole thing wet then letting out the hairband after it dries, or spray it with hairspray.
Thursday, August 4, 2011
Lesson 65: French Braid in Front
I've been seeing this one everywhere lately. You don't have to have super long hair, either. Tie it off where ever your hair ends, or use an X shape with two bobby pins right by the scalp without leaving at tail braid.
Part out the section of the front you want to braid. I used a bobby pin to hold the back hair out of the way while I braided.
This hairband from Gimme Clips is a flower stuck onto the band. I like the decoration. To add a hairband with a bauble on it, position the pretty in place first, then wrap the rest of the band around beneath, being careful not to catch flower petals or whatever in the loops.
Monday, July 25, 2011
Lesson 62: Ponytail with Two Braids
This is a super easy and fast style. Just put the hair in a ponytail, split the tail in two, and then braid the two sections. It is so simple, but adding two braids instead of the one you always see makes it unique. For the bow on top, I had a piece of ribbon too short to wrap around the hairband (the only orange I had), so I just folded the ends over twice to form two loops and then slid a bobby pin over the center. I tucked the bobby pin in behind the hairband, and it stayed in place there.
Monday, May 16, 2011
Lesson 50: Braided Braids
This is a simple technique that gives a complicated look. Belle wanted an Easter egg, so I started with a zigzag sort of shape, though the finished style looks very little like an Easter egg. To start, comb out a triangular section at the forehead and braid it out as far as you can. Add a clear elastic. Repeat with triangle sections at the side of the head. Put everything into a ponytail. Divide the tail into three sections, making sure there is a braid in each. Braid the tail. You will need to adjust the small braids with each turn to be sure they are visible. Add a hairband at the end. Remove the elastics if they are visible.
Friday, May 6, 2011
Lesson 49: Barbie Bangs
(Belle doesn't want me to take her video to french braid with wet hair, so I will post other stuff until she changes her mind.)
To begin, make a side part on the top of the head. Then part the hair across the top from ear to ear.
Pull the remaining hair back and secure it temporarily into a twist or bun, whatever will keep the hair out of the way and off the neck.
Brush the front sections of hair smooth flat against the head. I put it behind the ears, but you could cover the ears if you prefer (and if she/you can stand it on top of the ears). Bring both sides together at the back of the neck and tie them together with an elastic. Be careful not to get any of those tiny baby hairs or it will be painful. It helps to spray the hair above the neck with water to plaster down all the baby hairs before you bring the top sections back.
Let down the rest of the hair and brush it smooth.
When you buy a new Barbie doll, often the hair is done something like this in the front. I use Barbie bangs for the beginning step to several other styles, but it looks fine just how it is if you only want to leave the rest of the hair as is.
To begin, make a side part on the top of the head. Then part the hair across the top from ear to ear.
Pull the remaining hair back and secure it temporarily into a twist or bun, whatever will keep the hair out of the way and off the neck.
Brush the front sections of hair smooth flat against the head. I put it behind the ears, but you could cover the ears if you prefer (and if she/you can stand it on top of the ears). Bring both sides together at the back of the neck and tie them together with an elastic. Be careful not to get any of those tiny baby hairs or it will be painful. It helps to spray the hair above the neck with water to plaster down all the baby hairs before you bring the top sections back.
Let down the rest of the hair and brush it smooth.
Tuesday, April 5, 2011
Lesson 43: Two Braids into a Pony Fountain
I love the flair of this style, but Belle didn't like it. Middle or side part in the front, braid back into a pony. On the last loop of the hairband, make sure you are pulling the loop from behind the pony toward the outside, and instead of pulling all the hair through, pull it halfway through. Divide the tail end in two sections and pull them out to the sides. Clip a flower or bow on top. Turn the clip vertical with the hinge at the top and stick the back in through the hairband to help it stay in place better.
Or the simpler version that Belle prefers:
Monday, March 28, 2011
Lesson 42: Double Banded Pony with Braid
For this style, start with a side part on top. Comb out a rectangular section and braid it from the back corner or the rectangle. Braid it as far down as you can, then put in a clear elastic. Put the rest of the hair into a ponytail and add the braid to it. You can use two hairbands to do this if the braid sinks down and hides in the rest of the hair. Add another hairband down the tail of the pony where the clear elastic of the braid is (don't remove the elastic, just cover it up with the hairband).
Wednesday, March 23, 2011
Lesson 41: Ponytail with Bangled-Banded End
So I'll admit that this is nothing amazing, but it IS unique. Simple, but also functional. When Belle leaves her hair down or wears a ponytail and plays wild or goes out in the wind, all the hair whips around and gets tangled up. Then it takes longer to brush, and she complains that it hurts. I try to give her a hairdo that doesn't leave a lot of hair loose on windy days, especially. This one will cut back on tangles. I think it is self-explanatory, though I will give a tip for adding hairbands that have charms like these: position the charm in the middle of the ponytail and wrap that section first. Wrap the rest of the hairband either above or below the part with the charm. That way you will be sure to get it placed just where you want it.
Subscribe to:
Posts (Atom)