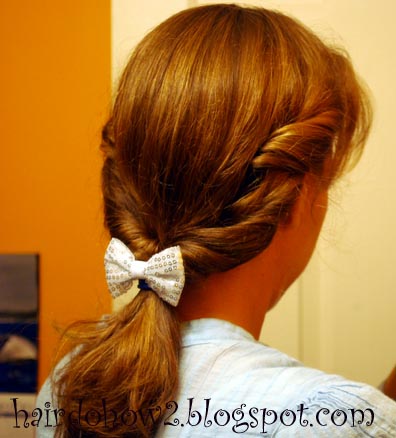
This braid looks like very difficult weaving, but it's really not so difficult. Begin with a ponytail. Divide the tail into three equal sections. For each section you will make an wavy braid by taking two tiny sections and braiding them with one large section, and then tugging gently at the edges of the large sections to make them flair out a bit.
Make three of those braids, and then braid them all together.
Add bows or bows or flowers to accessorize. (Ours are from Gimme Clips.)
Showing posts with label ponytail. Show all posts
Thursday, September 12, 2013
Friday, February 8, 2013
Braided Heart Ponytail
To help celebrate Valentine's Day, here's another heart shaped hairdo. Instructions are show for the ponytail version, but this is also really cute as pigtails. (This picture is from a long time ago!)
Begin with a front piggy. Put the rest of the hair in a low pony, being sure to leave the tail of the top one out.
Braid two sections of the lower ponytail at the sides. Make them as even thickness as you can. Secure the ends with a temporary clip.
Pull the braids up and then back down to add them with the hair of the top piggy.
Add an elastic here, careful to keep the braids at equal lengths on either side. Split the hair from the tail in half, and tuck them behind the braids.
The braids will make a C shape on either side. To get the sharper angle at the bottom of the heart, you can fold them up and add another elastic on top of the pinch.
The ends of the braids will be much shorter than the tail of the pony. If they pop out the sides like in the above picture and that bothers you, you can add this additional step. Pull the short ends together behind the ponytail. Wrap a small clear elastic around them a few times, and then once around to whole ponytail.
I'll admit this makes the bottom look kind of weird, but that can be hidden with a flower or bow. (Satiny flower clip from Gimme Clips!)
Click the Valentine's Day link on the right sidebar to see more Valentine's Day hairstyle ideas.
Begin with a front piggy. Put the rest of the hair in a low pony, being sure to leave the tail of the top one out.
Braid two sections of the lower ponytail at the sides. Make them as even thickness as you can. Secure the ends with a temporary clip.
Pull the braids up and then back down to add them with the hair of the top piggy.
Add an elastic here, careful to keep the braids at equal lengths on either side. Split the hair from the tail in half, and tuck them behind the braids.
The braids will make a C shape on either side. To get the sharper angle at the bottom of the heart, you can fold them up and add another elastic on top of the pinch.
The ends of the braids will be much shorter than the tail of the pony. If they pop out the sides like in the above picture and that bothers you, you can add this additional step. Pull the short ends together behind the ponytail. Wrap a small clear elastic around them a few times, and then once around to whole ponytail.
I'll admit this makes the bottom look kind of weird, but that can be hidden with a flower or bow. (Satiny flower clip from Gimme Clips!)
Click the Valentine's Day link on the right sidebar to see more Valentine's Day hairstyle ideas.
Friday, January 11, 2013
Waterfall braid Woven-look Ribbon Headband Ponytail
This style is challenging, but so neat! Start with an ear to ear part at the front of the ear. Keep the front hair out of the way for a while (clip or bun, etc.). Do another ear to ear part at the back of the ear 3 or 4 cm behind the first part. Pull the back hair into a ponytail. Half-dutch braid across the top middle of the head.
Lay a ribbon across the top of the head. Insert one end through the hair at the beginning of the braid. (I used a Topsy Tail tool.) The other end will stay put when pull it back into the ponytail because of the braid.
Next do a waterfall braid with the front section of hair. The pictures show this step before the ribbon, but I think it would be better to do the ribbon first. Braid the ends as far down as they will go.
Using a Topsy Tail tool, or floss and a craft needle, thread each "fall" through the dutch braid.
Undo the ponytail. Make a new low ponytail, adding in the extra hair from the falls and the braids. Also add in the ribbon ends.
Tie a bow with the ribbons. Add a flower if you like. Belle's ribbon and flower are provided by Gimme Clips. Thanks Gimme Clips!
Tuesday, October 9, 2012
Disney's Beauty and the Beast Belle Hairstyle
Begin with damp hair. You can add some styling product such as gel or mousse at this point. Comb it all back straight.
Using a hairdryer, blow the bang area hair back while using a comb to train the hair to go where you want it.
Comb back, and then push the comb forward to form a bump. Add some hairspray. You can continue to blow it a bit, perhaps on low or with a diffuser if your hairdryer's high setting blows the hair all over the place and out of the comb.
Use a comb or brush to blow out the sides sections over the ears. Use the same technique as you did with the top.
Part the hair in the middle. If you do not have cut bangs, you could try to get a poof by adding a bobby pin in this place after lifting and pushing the hair forward.
Take the side section and brush it toward your face. Hold it out and twist it loosely.
Pull it back against your head...
...and then push it upwards. Add a bobby pin to hold it down. This is done in a similar way to the Dorothy hairstyle. (This is a nice finished style for a regular day.)
Repeat on the other side. Brush down the hair at the back of the head so it is smooth. Now roll up loosely the hair that is at the bottom side.
Repeat on the other side, then put them together.
The twist will be laying over some hair from the back of the head. It may be necessary to add some of this hair into the twists, if you can manage it. You may need to ask for someone's help to hold one of the twists for you while you work on the other. Add an elastic around the whole thing.
To get some more poof, gently pull out some of the hair at the edges of the roll.
Add a bow. You can tie a ribbon to make a bow or add a bow clip. (Mine are Gimme Clips--these will be coming out to Associated Food Stores, but there isn't a blue one.)
For a more everyday look, after I took these photos, I undid the whole thing, brushed it through (especially to settle down my bangs), and twist the sides in one step instead of two, and without trying to get the extra volume.
Tuesday, June 12, 2012
Half-dutch Headband with Twists into Messy Bun and Variations
Here is a style that I had put in my gallery when my blog was rather new, but never did the step by step directions until now. It's in my banner, too.
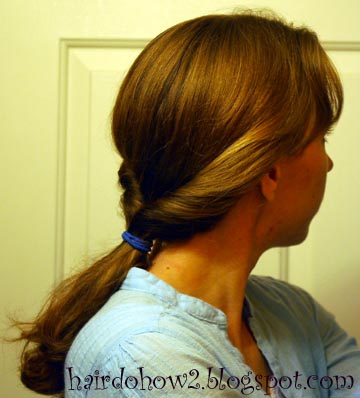
Begin with a part at the back of the ears across the top of the head. Put the back hair into a ponytail.
Part a strip from the top of the ears across the top, maybe an inch and a half thick or so. Get the front hair out of the way with a clip.
Do a half dutch braid ending at the side of the head, meaning that you add in all the rest of the from above the ear before you actually get down to the ear. Then braid to the end.
Pull the braided tail over the top of the hairband. Twist the bang section and draw it up over the ponytail, clipping it in place temporarily. You may have to twist part of the hair and then add a little more to it while you keep twisting to get it to look right.
Twist the other side and bring it up over the pony.
Add another elastic over the whole thing.
You can leave it like this. I think it looks nice this way. Or turn the back into a messy bun. You can leave the braid in or take it out.
Here are some old pictures from when I did it a long time ago. On the smaller side I did a regular braid instead of another twist.
Here is another variation with the same general instructions, you just do a hawser twist instead of the half dutch and simple twist. This also just has a fancy hairband on a ponytail instead of a messy bun.
Begin with a part at the back of the ears across the top of the head. Put the back hair into a ponytail.
Part a strip from the top of the ears across the top, maybe an inch and a half thick or so. Get the front hair out of the way with a clip.
Do a half dutch braid ending at the side of the head, meaning that you add in all the rest of the from above the ear before you actually get down to the ear. Then braid to the end.
Pull the braided tail over the top of the hairband. Twist the bang section and draw it up over the ponytail, clipping it in place temporarily. You may have to twist part of the hair and then add a little more to it while you keep twisting to get it to look right.
Twist the other side and bring it up over the pony.
Add another elastic over the whole thing.
You can leave it like this. I think it looks nice this way. Or turn the back into a messy bun. You can leave the braid in or take it out.
Here are some old pictures from when I did it a long time ago. On the smaller side I did a regular braid instead of another twist.
Here is another variation with the same general instructions, you just do a hawser twist instead of the half dutch and simple twist. This also just has a fancy hairband on a ponytail instead of a messy bun.
Labels:
braids,
dutch braids,
hawser twist,
messy buns,
ponytail,
rolled twists,
up-dos
Subscribe to:
Posts (Atom)