
A (mostly girls' hairstyles) blog created for those who want to learn how to style hair at home, from beginner basics to fancy schmancy.
Saturday, December 22, 2012
Merry Christmas!
I hope you all have a wonderful holiday season. I haven't forgotten my blog, but have been very very busy with family duties, holiday preparations, and volunteer work. I should have time again to post tutorials soon!
Tuesday, December 4, 2012
Triple Messy Buns

I don't have step by step pictures because it was a busy day. (I've been having a lot of those lately!)
Start with two front piggies. Divide the back of the head into three high piggies, combining the hair from the front piggies with the two outside ones at the back. The middle piggy will be a long rectangle about 2 inches/5 cm wide. Make messy buns out of all three.
Monday, November 19, 2012

Thursday, November 8, 2012
Halloween Costumes
In all the hustle and bustle of the day, I didn't get a good shot of Belle's hairstyle for Halloween. It was so cute, though! I did two dutch braids and then folded the ends over each other and tucked in the ends to make something like a wide braided bun at the bottom. I may have to do this style again and post it.
 I didn't have time for sewing this year, but we pulled it off with a hand-me-down dance costume from my niece, some gorgeous and gigantic butterfly wings from Jo-Ann Fabrics, and several borrowed parts to make a pirate. I have really nice neighbors.
We handed out glow-in-the-dark fangs and bugs, pencils, lip gloss, and mini card games. No candy! Lots of the kids were very excited to get something besides candy. One even said, "This is the coolest house ever!" Now is the time to get some of this stuff on clearance and save it for next year.
We handed out glow-in-the-dark fangs and bugs, pencils, lip gloss, and mini card games. No candy! Lots of the kids were very excited to get something besides candy. One even said, "This is the coolest house ever!" Now is the time to get some of this stuff on clearance and save it for next year.
Monday, November 5, 2012
Crazy Hair Day: The Flowerpot
For this style I was inspired by the little face in the bottom right corner on the Dr. Suess webpage. Belle's school has crazy hair day during ribbon week (no longer just RED ribbon, but all sorts of colors), but I wanted to do a Dr. Suess hairstyle for all of you that have crazy hair day in March for Dr. Suess' birthday. (Check the side bar for more Dr. Suess/crazy hair ideas.)


To start, make a ponytail with the hair at the top of the head. I saved out a section near the bangs to sweep off to the side so it will still be pretty even though it is crazy. This is optional depending on whether you have bangs or cowlicks or whatever. I used colored hairbands thinking they would be hidden, but since they do show a bit, you could use a color to match the hair if you prefer.
Center and wrap a pipe cleaner around the base of the hairband and twist the ends together a couple times at the bottom.
Add another pipe cleaner around the first one, this time not centered, but with one end long. Twist it to hold it in place.
Fold it upward.
Pull the hair from the pony upward so it goes around all sides of the pipe cleaners. Add an elastic a few inches higher than the first around the hair and pipe cleaners.
Drop the hair, and arrange it so that it evenly distributed around the ponytail. Add an elastic to the bottom, careful not to pull the "flowerpot" out of shape. It may be helpful to twist the elastic to form two loops before inserting it over the pipe cleaners.
Fold the two short ends of the pipe cleaner over to look like leaves. Using tissue paper, cut a flower shape like this one. Fold the paper in half then half again and cut the edges to be round. (Fold in half again to get the petals to be symmetrical.)
Scrunch up the center of the flower and tape it onto the long pipe cleaner. Bend the pipe cleaner to look wiggly.
Make a part at the back of the head, and make two pigtails just above the ears. Include the hair from the flowerpot.
The pigtails will have two lengths of hair, the shorter section from the flowerpot. Divide the sections. Using only the longer hair, wrap it around the hairband and then into a knot.
Use a clear elastic to hold the knot in place.
Add a bow, if you like.
Belle won the "craziest hair" competition in her classroom. Her teacher couldn't believe she had a flower growing out of her head!
Wednesday, October 24, 2012
School Pictures
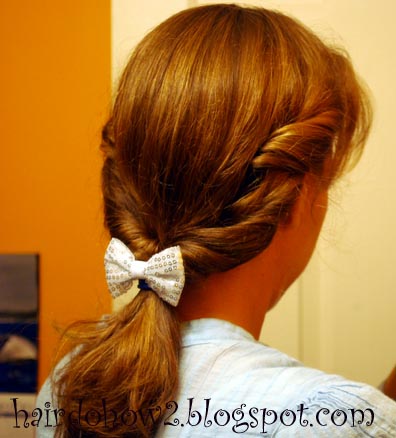
It's time for school pictures again. There are a few things to think about when choosing a hairstyle for a photo shoot. First of all, the back of the head obviously isn't going to be seen, so any style that looks amazing from the back but not the front is not a good choice. I prefer down-dos rather than updos because they tend to frame the face better, in my opinion. I also like seeing how long Belle's hair is from year to year in her portraits since it has changed in length so much over the years. I think the person's face should be what draws attention in a portrait, and that the hair should complement the face, rather than draw attention away. That is why I choose simple styles with few or small embellishments rather than large flowers and bows. Here is Belle's picture day hair for this year. It is a hawser twist done like a half dutch braid (adding hair from only one side) with the bang section of hair.
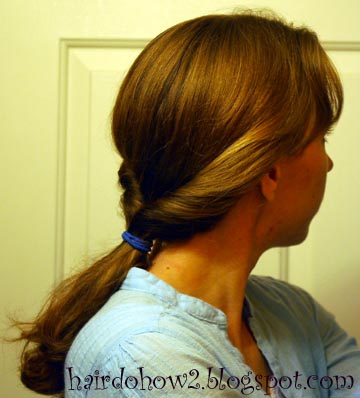
 Rather than spend an arm and a leg on portraits from the school (which often come back looking goofy anyway), I take a portrait of my kids at home. I took this portrait last week in our bathroom. I hung some fancy sheer fabric over the shower curtain rod, brought in an extra lamp, and took a bunch of shots. I let Belle choose her favorite, and then touched it up on my computer. Now I can print as many as I want wherever I want to have them printed. (Belle's sparkly bobby pins are from Lilla Rose.)

Tuesday, October 16, 2012
Curlformers Review


There are a few cons. Sometimes they hurt a bit putting them in because the hair can get pulled too tight on the hook and with the rubber ends of the curlers. Also, if you try to use too big of a section of hair, you can get the hair and hook stuck in the middle of the tube. Curlformers are very expensive! When I first heard of them, I was excited to try them out until I discovered how much they cost. You can buy a whole kit for a somewhere around $60 or so, but I don't remember really how much. I elected to get a refill pack and a hook to start of. The refill pack has only 6 curlers. I think it was about $13 or so... I waited until I had a really good coupon, and I got them at half price. Then several months later I bought another six with another good coupon. I am gradually building up my supply.
Belle does not complain about them while she is sleeping when there are only a few, but I think she may have a hard time with a whole head full of them all night. I can't sleep with anything in my hair, personally.
Tuesday, October 9, 2012
Disney's Beauty and the Beast Belle Hairstyle


For a more everyday look, after I took these photos, I undid the whole thing, brushed it through (especially to settle down my bangs), and twist the sides in one step instead of two, and without trying to get the extra volume.
Wednesday, October 3, 2012
Braid Rose

Tuesday, September 25, 2012
Lace Headband

Draw the bangs back and use a bobby pin to hold them in place. Put the lace on the top of the head covering the bobby pin. Tie it in a bow at the back of the head under all the hair.


Monday, September 17, 2012
Dorothy Gale Hairstyle (Wizard of Oz)

Start with a part down the center. (I've altered it a bit here to accommodate for Belle's front side cowlick by beginning the part at the side and curving it to the middle for a centered part at the back.) Clip one side of hair out of the way temporarily. Starting at the forehead, make a rolled twist to about 3/4 of the way down the side. Twist the hair, and gradually add in more and more as you go down, using a comb to smooth it out along the way if you need to.


Friday, September 14, 2012
A Word from Lilla Rose
Lilla Rose Independent Consultant, Linda Menke, is sponsoring a special Mystery Hostess Party starting Sept 15th and ending at midnight on Sept 29th. Everyone that orders will have a chance to be the Mystery Hostess and receive all the Hostess Rewards! In addition, due to a vendor swap also going on this month, the party is guaranteed to earn at least $450 in sales and all other orders will only increase that amount. This is a great chance to order that new Flexi or other item you’ve been wanting (Check out the Flexi of the Month for Sept. – it’s beautiful) AND, if you are chosen as the Mystery Hostess, you can get lots of Lilla Rose loot for the holidays or for yourself.
Don’t forget that Flexi Clips also make great scarf clips so a great gift idea is to give one with a pretty scarf. The XS, S, and M sizes are best for scarves. Also the smaller Flexis and O-Rings make adorable napkin rings and curtain ties as well.
To order from the party, Click Here. Add yourself as a guest by entering your information under “New Guests Register Here.” From there, simply shop and check-out. NOTE: Items ordered through the party will not ship until after the party closes on the 29th. Then I will select a Mystery Hostess, get the Hostesses Rewards ordered, and close the party. If you order, be sure to check your e-mail early on Oct 30th as you won’t have more than a few hours to decide what items you want for your Hostess Rewards before I have to close the party (by midnight on the 30th). Items will probably ship by Oct. 2nd. If you have problems or questions, please e-mail Linda at cliptomania@ymail.com. Have Fun!
Friday, September 7, 2012
Belle's 1st Day of School


Monday, August 27, 2012
Feather Fashion Clip Extensions

Feather Fashion Clip Extensions sent us these (real) feathers to try out. I like them because they have a tight grip that doesn't hurt, but are easy to put in and take out, and you can use them over and over. The teeth open and close like a snap barrette, and there is a little rubber tubing one side to keep it from sliding.


This hairstyle is a simple french braid. I braided back a bit, inserted the clip behind the braid, and then continued a bit further with the french braid.
For anyone that is crafty and creative, the little ring that holds the feathers on is malleable, so you could open the ring, remove the feathers, and hook on something of your own creation. I would consider buying the feathers just because the clip is so neat.
To get these feather clips, you can email abell@lifestyle-prod.com. You can see the other colors they have at their facebook page. (They are $5 each with $2 shipping for up to 6 clips.)
Subscribe to:
Posts (Atom)