Happy Easter everyone! I hope you are all enjoying the spring as much as I am.
For inspiration for more Easter hairstyles, take a look at the side-bar links to hairstyles for Easter, up-dos, and special occasions, or look in our gallery.
No tutorial today--our family is so busy!

A (mostly girls' hairstyles) blog created for those who want to learn how to style hair at home, from beginner basics to fancy schmancy.
Wednesday, March 27, 2013

Thursday, March 14, 2013
Rainbow Ponytail

To begin, put the hair in a ponytail. Measure a piece of ribbon off the spool the length of the ponytail, add a little bit more to account for wrapping, and then double it. Cut the ribbon. Cut all the other ribbon colors the same length. Insert the ribbons stacked in rainbow order (red, orange, yellow, green, blue, purple) into one of the loops of the hairband, and center the ribbon.
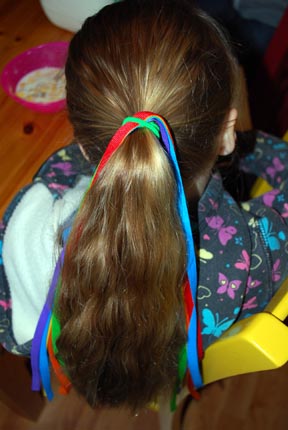


If you have success with this hairstyle or have any tweaks or improvements, I invite you share your photos on our facebook page!
Don't forget to check the link at the sidebar for more St. Patrick's Day hairstyles.
Monday, March 4, 2013
Elegant French Braid Updo


Thursday, February 28, 2013
Crazy Hair Day: Rag Rug

This hairstyle is a half dutch cornrow spiraling all around the head. Start at the crown with a small section, begin braiding around. Since I was just playing, I used my fingers to draw up new sections of hair, but you could make it look a little neater if you use a comb. There is nothing you can do about the ends of the hair sticking out. Once the hair you began braiding with runs out of length, you'll have a new piece of hair running out with every plait til the end. Braid down the end when you run out of hair on the scalp to add in. Wrap it around, tuck in the ends, and bobby pin it in place. Or just leave it hanging for more craziness.
I call this the rag rug because it reminds me of those braided oval or circular rugs.

Thursday, February 21, 2013
Milkmaid Braids
I've already posted a different version of the milkmaid braids here, but I wanted to do this one that's a little different for shorter hair.
 As you can see in the picture, you don't cross the braids over the back like the other post, but braid above the ears and pull them straight up. I fastened off the end of the braid with a clear elastic, and then added another clear elastic down from the first to keep the ends of the tail from fraying out as much.
You have to draw the braids up together and then use bobby pins to hide each tail under the other braid. It helps if your braids are loose and wide so you can spread them out flatter and make more room for the tails to hide.
 You can see the elastic just a bit here. It would help if her hair were maybe an inch longer.
You have to draw the braids up together and then use bobby pins to hide each tail under the other braid. It helps if your braids are loose and wide so you can spread them out flatter and make more room for the tails to hide.
Friday, February 8, 2013
Braided Heart Ponytail


Begin with a front piggy. Put the rest of the hair in a low pony, being sure to leave the tail of the top one out.


Tuesday, January 29, 2013
A Lilla Rose Party
I received this email from Linda Menke and thought I would share it with all of you:
You are invited to a Customer Appreciation Party hosted by your Independent Lilla Rose Consultant (#817650), Linda Menke!
I was thrilled, surprised, and shocked to learn that I was #1 in Sales at Lilla Rose for 2012 and I have all of you to thank for it. The Lord had blessed me with so many new friendships and opportunities through Lilla Rose and I’m so grateful to be part of this amazing company. This party is my way of giving back to you, my devoted customers and bloggers for all your help last year. Here are the details.
The Party will run from Jan 31st through Feb 8th and you can order items through this party link: www.lillarose.biz/parties/1487
Everyone that purchases an item through the party link is eligible for at least one entry into the giveaway. Prizes for the giveaway are:
$100 in FREE Lilla Rose Product
$75 in FREE Lilla Rose Product
$50 in Free Lilla Rose Product
And one lucky person will be chosen as the Mystery Hostess and will earn all the Hostess Rewards for the party! This is a great opportunity to get some FREE Lilla Rose Loot. During the length of the party, there will be a Facebook Event going on at https://www.facebook.com/events/143359259156351/ for you to submit questions or ideas. I’ll be checking into that event once or twice a day to answer questions and to add videos and other information.
On Feb 1st, Lilla Rose will release the new February Flexi of the Month! The February Flexi of the Month is usually a romantic style but you never know what the designers at LIlla Rose have up their sleeves. So watch for that and, if it’s one you want, order it quickly as they typically sell out very quickly!
Every item you purchase is one entry into the giveaway. If you order 3 or more items, you can get one item (up to $16 in value) FREE, even if you are not a new customer! Plus orders of 3 or more items, will get 3 additional entries into the giveaway. So if you order 3 items from the party, you will get one FREE item plus6 entries into the giveaway! If you order 3 or more items, e-mail me at cliptomania@ymail.com with your order details, the FREE item you want, and your mailing address to get your FREE item and your extra entries.
Share this party on your Facebook page and get another entry. E-mail me at cliptomania@ymail.com with the link to your post to get your entry.
Bloggers – Blog about this party in a dedicated post and earn 10 entries into the giveaway. Mention it in another post and earn 5 entries (every time you mention it). So get the word out and earn entries. E-mail me at cliptomania@ymail.com with the link to your posts to get your entries.
The party will close on Feb 8th at 10pm (NO EXCEPTIONS). This is necessary so that you can get your orders by Valentine’s Day. To ensure Valentine’s Day delivery, request Priority Shipping on your order.
So start shopping and have fun! THANKS!
Subscribe to:
Posts (Atom)