Thursday, April 14, 2011

Lesson 44: French Braid (part A--basic concept)

Since learning how to french braid is difficult for some people to figure out, I'm going to break my instructions down into a few parts.  This first part is just getting the basic concept down.  In order to french braid you first have to know how to do a regular braid.

I've made this board out of a cracker box.  Punch three holes at the top and an equal number of holes down each side (I did six).  Use three colors of yarn.  Cut one piece at a time, measuring a rough estimated length a few inches below the box.  Fold the piece in half so the fold will be at the hole and the two ends will reach down below the box.  Every piece down the sides can be shorter than the one above it.  Push the folded end through the hole, open the loop and bring the ends through the loop. Pull tight.  Follow the numbered pattern I have written in the picture so you will know which color to put in which hole.  Making a practice board will give you the chance to work out the fingering without boring your model head of hair.  It helps to stick it in a clipboard so you can pull the strands without the whole thing getting away from you.
Begin like a regular braid with three strands from the top.  Start by crossing left over middle.
Now right over the new middle.
A regular braid would have you cross the left over middle, but to make it a french braid you must first add some more hair (yarn) to the left strand.  Then cross it over the middle strand.
Do the same on the right side: add more before crossing over the middle.
Keep doing this over and over with each strand until you get to the bottom where there is not hair (yarn) left.
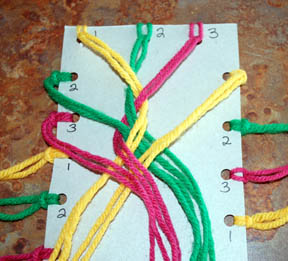
 
Once you've reached the bottom, continue braiding the strands together without adding hair.
Then add your hairband.
Here's a video.  (Please pardon my speech trouble--it's hard to concentrate on so many things at once!)

Monday, April 11, 2011

Cascading Curls

I got this idea from Babes in Hairland's Cascading Waterfall Ponytail (thanks BIH!).  I'll spare the detailed instructions since she did it already, but I will leave my note, that Belle's hair appears to be a great deal heavier than Goose's, so after a short time the pull-through (topsy tail) started slipping down and was no longer hidden by the curls.  It wasn't so pretty anymore.  I haven't tried it again since then, but I would consider cinching down layers of the hair at the top of the pony with several bobby pins to help it hold.  I suppose a no-slip grip hairband wouldn't slip, but those are too painful to try with a pull-through.
This style seems better suited for medium length or thin hair.

Tuesday, April 5, 2011

Lesson 43: Two Braids into a Pony Fountain

I love the flair of this style, but Belle didn't like it.  Middle or side part in the front, braid back into a pony.  On the last loop of the hairband, make sure you are pulling the loop from behind the pony toward the outside, and instead of pulling all the hair through, pull it halfway through.  Divide the tail end in two sections and pull them out to the sides.  Clip a flower or bow on top.  Turn the clip vertical with the hinge at the top and stick the back in through the hairband to help it stay in place better.
Or the simpler version that Belle prefers:

Friday, April 1, 2011

Happy April Fool's Day

Today Belle wanted this ridiculous elephant hairstyle I gave her last August when we were entering the contest at Babes in Hairland to try and win tickets to the circus.  I just couldn't do it!
After a third failed attempt at making this Rapunzel style from the new Disney movie Tangled (I will get this right and post it!), I gave up and tried something completely different.  Click here for the Rapunzel tutorial.
This is basically a four strand flat plait (instructions coming in the future) turned up and tucked back down through.  The ribbon is tied to the top crossover section of the plait before it is turned.  I tried keeping it all in place with mini clips and bobby pins, but they were falling out and pulling "ouchy" places before she even left for school.  She also complained she didn't like the tail sticking out the bottom and that it was itchy.  So another error that needs more trials.

Monday, March 28, 2011

Lesson 42: Double Banded Pony with Braid

For this style, start with a side part on top.  Comb out a rectangular section and braid it from the back corner or the rectangle.  Braid it as far down as you can, then put in a clear elastic.  Put the rest of the hair into a ponytail and add the braid to it.  You can use two hairbands to do this if the braid sinks down and hides in the rest of the hair.  Add another hairband down the tail of the pony where the clear elastic of the braid is (don't remove the elastic, just cover it up with the hairband).

Thursday, March 24, 2011

Any Style Requests?

I would like to know what hairstyles you are hoping to learn.  Please leave a comment under this post if you want to know how to do something I haven't taught yet.  I will do my best to teach it.

So far I haven't shown any hairstyles with french braiding.  I am planning to teach french braiding soon, but I have to work out some video technology first.

Wednesday, March 23, 2011

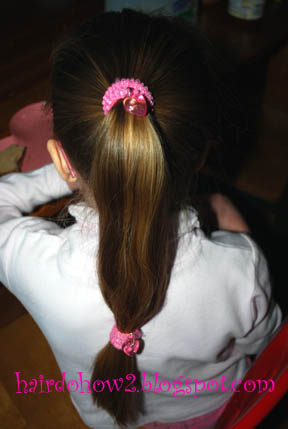
Lesson 41: Ponytail with Bangled-Banded End

So I'll admit that this is nothing amazing, but it IS unique.  Simple, but also functional.  When Belle leaves her hair down or wears a ponytail and plays wild or goes out in the wind, all the hair whips around and gets tangled up.  Then it takes longer to brush, and she complains that it hurts.  I try to give her a hairdo that doesn't leave a lot of hair loose on windy days, especially.  This one will cut back on tangles.  I think it is self-explanatory, though I will give a tip for adding hairbands that have charms like these:  position the charm in the middle of the ponytail and wrap that section first.  Wrap the rest of the hairband either above or below the part with the charm.  That way you will be sure to get it placed just where you want it.