Tuesday, June 28, 2011

Lesson 56: Braid Cross with Fountains

It has been a year and a half or so since I took this picture of Belle.  Her hair has grown out a bit so now it doesn't look so cute to do this style, but I'll give you the how-to anyway.  Begin by parting the hair across the middle from ear to ear and tying the back section temporarily.  Part the top straight back from the forehead, and braid the two front sections.
Now part the back down the middle to make pigtails.  Use thinner hairbands because you will be adding multiple bands and don't want it to get too bulky.  I used different colors just for demonstration, but it is better to use all the same color.
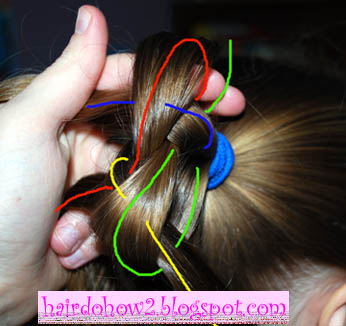
Cross the braids and add them into the pigtails.  Add another elastic on top.  You can then scoot the first elastic out and remove it or just leave it.
Undo the braided tails then rebraid including the rest of the hair in the piggy.
Fold the braids up and attach the ends with the top of the pigtails.  Add another hairband or tuck it into the hairband that is already there if you can.
Here's the magic trick that makes this style unique: Use a mini claw clip to stick the bottoms of the braids together.  Hide it in the back so it is not easy to see.  It's best to use clear or one the same color as the hair.
Last, spray the tails that are sticking out with water to shape them how you want, and let them air dry.

Monday, June 27, 2011

Lesson 55: How to Dutch Braid/ Inside-Out French Braid

The dutch braid is almost the same technique as a french braid, but you cross the sections underneath instead of over the top.  Start in the front, gather up a section, and divide it into three equal parts.  Cross one side under the middle.
Cross the other side under the (new) middle.
Draw up a portion of hair to add in with the section at the side, then cross it all under the middle.
Add hair to the section on the other side and cross it under the middle.
Repeat on the other side.
Continue in this pattern until you run out of hair.  Keep braiding by crossing sides under middle.  Fasten off with a hairband.
This braid has nothing to do with the Dutch, as far as I know.  But then neither does the french braid come from France.  According to Wikipedia, what Americans call a french braid, the French call an American braid.  Funny.

Tuesday, June 21, 2011

Lesson 54: Single Woven and Braided Bun

This style is done the same way as the last style I posted, just singular instead of parting and making piggies.  It was slightly more difficult as a ponytail because of the different lengths of hair strands.  I had to end the braids higher up and do more tucking the ends in.  Also, the four strands are heavier and don't cooperate as well when weaving.  I would suggest using clips or pins (being careful not to mess up the ponytail) to hold them in place while you are doing the weave.  Wet hair helps, too.

Gimme Clips graciously sent us some hair do-dads to play with.  This beautiful flower is from the headband combo (which I will show later).  I've added Gimme Clips to my list of sponsors.  Thanks Gimme Clips!

Monday, June 20, 2011

Interesting Poll Results

I am surprised the way the poll is turning out.  It looks like I have more teen viewers than anything else.  That may change the type of styles I will focus on.  Right now I have a long list of ideas I need to get to without a whole lot of time, but I will start thinking about popular teen styles.

One day left to take the poll.  Thanks!

Tuesday, June 14, 2011

A Word about Parts and Sunshine

Summer time, of course, is a great time to get outside and get some sunshine, but don't forget to use sunscreen.  Even scalps can get burned.  If you are planning a day outside in the sun, think carefully about what hairstyle can keep that head shady.  A hairstyle with no parts (like a ponytail) keeps it all in the shade.  A single part (like pigtails) will leave a stripe of head exposed.  You can protect it by putting a bit of sunscreen in the palm of your hand and dabbing it onto the part with your finger.  If you choose a style with lots of parts, it will be a pain to cover it all with sunscreen, so make sure she wears a hat, at least.  If the scalp does get burned, be gentle when combing the hair because it can really hurt.  If it gets burned bad enough, it will flake off like dandruff a few days later.  You can use a soft bristle brush to gently scrub the flakes off (it shouldn't hurt anymore by the time it starts flaking).

Tuesday, June 7, 2011

Searching for Fountain Braid?

Click here to see the fountain braid tutorial.

I have been getting a lot of hits on my site by people looking for a fountain braid.  I am not sure what it is exactly, unless it is another name for the waterfall or fairytale braid.  Or is it the same thing I called whale spouts in this post?

Please leave a comment to describe the style you are looking for and I'll see what I can do.

Monday, June 6, 2011

Lesson 53: Woven and Braided Buns

On my style request post "Ryan Family" asked for a tutorial for this braided bun, which is actually a hairpiece you put over top of your own (short hair ponytail or small bun).  This is what I came up with.  It doesn't look exactly the same, but I still love it.  Belle reminded me of a Japanese anime cartoon when it was done.  The weaving part is sort of complicated, but a braided bun can be done without the weaving just by braiding the ponytail (one braid or more) and wrapping the braids around and tucking in the ends with bobby pins.
(Once again, pardon the weird pictures--my software is pretty old, and I can't update it anymore.)  Put the hair in pigtails.  Or you could just do one bun at the back.
Divide the pigtail into four equal size sections.
Now comes the weaving part.  Bring the top left section (red lines in the pictures below) over the bottom left section, but keep a loop hole open in it for later on.
Cross the bottom left section (yellow) over the top one you just brought down and over the bottom right section (green).
Take the bottom right section (green) up over the one you just crossed (yellow) and over the top right section (blue).
Cross the top right section (blue) over the one you just brought up and then tuck it into the loop you've been saving open from the first strand (red).
Now pull all the tails to tighten up the weave.
Braid all the tails as far as you can go and add clear elastics.
Wrap a braid around the whole thing, looping until you run out of hair.  Tuck in the tail and pin it in place with a bobby pin or two.
Repeat the wrapping around step with every braid.  Add more bobby pins if anything sticks out.  Repeat for the other piggy.

If you really prefer the look of one big braid around the whole thing with the weave in the middle, I suppose it could be achieved by doing sort of a french braid around the weave instead of braiding each strand.  I haven't tried it. If you try it and get some success, I invite you to email a picture, and I'll post it.